Thursday, December 31, 2009

Raspberry Buttermilk Cake

Another Smitten Kitchen recipe. Find the original here.

Photobucket


1 cup (130 grams) all-purpose flour
1/2 teaspoon (2 grams) baking powder
1/2 teaspoon (2 grams) baking soda
1/4 teaspoon salt
1/2 stick (56 grams) unsalted butter, softened
2/3 cup (146 grams) plus 1 1/2 tablespoons (22 grams) sugar, divided
1/2 teaspoon pure vanilla extract
1/2 teaspoon finely grated lemon zest (optional)
1 large (57 grams) egg
1/2 cup well-shaken buttermilk
1 cup fresh raspberries (about 5 oz) I used a half pint container, minus the few I had to taste
Preheat oven to 400°F with rack in middle. Butter and flour a 9-inch round cake pan.
Whisk together flour, baking powder, baking soda, and salt and set aside. In a larger bowl, beat butter and 2/3 cup (146 grams) sugar with an electric mixer at medium-high speed until pale and fluffy, about two minutes, then beat in vanilla and zest, if using. Add egg and beat well.
At low speed, mix in flour mixture in three batches, alternating with buttermilk, beginning and ending with flour, and mixing until just combined.Spoon batter into cake pan, smoothing top. Scatter raspberries evenly over top and sprinkle with remaining 1 1/2 tablespoons (22 grams) I only used 1T sugar.
Bake until cake is golden and a wooden pick inserted into center comes out clean, 20 to 25 minutes. Cool in pan 10 minutes, then turn out onto a rack and cool to warm, 10 to 15 minutes more. Invert onto a plate.
My original plan was to make a Trifle from Ina Garten. Then I pictured myself making this fairly complicated recipe and realized it wasn't going to happen. Since I had already been to the grocery store, however, I looked for a recipe that included the major ingredients I had specially purchased, buttermilk and raspberries. This was the first hit and since I <3>
The only tasting I've done so far is what stuck to the bottom of the pan, but that was quite tasty. I didn't use any lemon zest, but made the recipe exactly as written. I had to bake this the full 25 minutes (SK's readers commented that the original recipe's bake time was too long).
Can't wait to try a whole piece!


Photobucket

After trying slice and a half (one on the day of, one the next day for breakfast), I have to say that this cake is AWESOME. I will most definitely be making it again. It was easy to throw together, probably could be used with whatever berries are cheapest, and is delicious. So much easier than that trifle! I wonder, though, how it would come out with frozen berries??

Pear Gorgonzola Butter

Making this for tonight's New Year's Eve festivities. I threw it all together last night, and have it "marinating" in the fridge.

Original recipe came from Cooking Light; find it here.

I had some last night, and thought it was tasty, but perhaps the Gorgonzola (Gorgon makes me think of that movie Little Soldiers... you know, the Gorgons:)


Pardon the digression.

Anyway, the Gorgonzola might be too much in this dish, or maybe I just used too much. It's probably not my favorite cheese in the whole world, and the pear does a nice job of balancing. I might add some pear juice in if BAJ agrees.
Photobucket


Ingredients

  • 1/2 cup chopped canned pear halves, drained
  • 1/2 cup (2 ounces) crumbled Gorgonzola cheese I accidentally got creamy Gorgonzola
  • 1 tablespoon (1 ounce) 1/3-less-fat cream cheese, softened
  • 1 (8-ounce) loaf French bread baguette, cut into 12 slices and toasted

Preparation

Combine all ingredients except bread in a small bowl; mash with a fork until well blended. Serve with bread.


So, after asking BAJ and another friend, it was suggested that I NOT add more pears or pear juice. It really didn't move. I didn't really like it any better after letting it sit in the fridge. It was easy, and a really nice idea, but it just isn't something I'll make again.

Tuesday, December 29, 2009

Holiday Jar Gifts

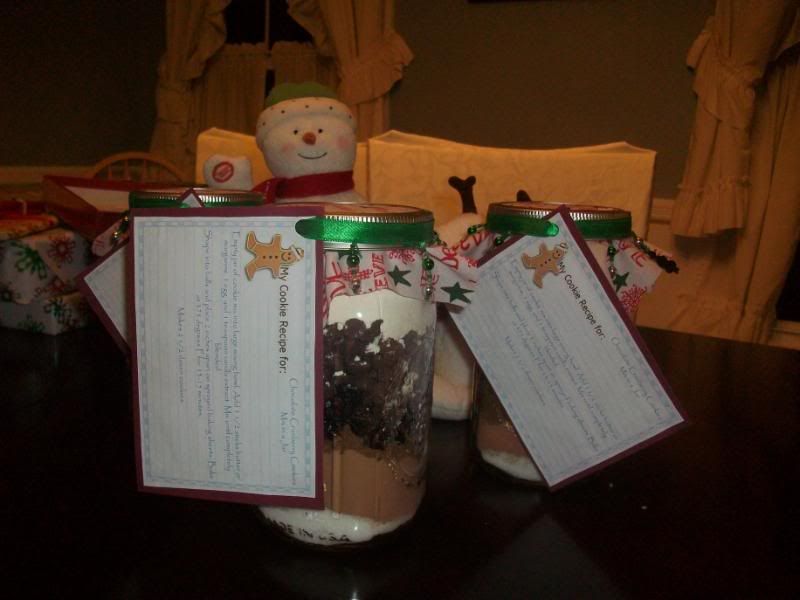
This year, we were short on time and on money. I didn't really want to just give A's teachers gift cards, so instead decided to give them jars to make cookies. I really hope they use them and like them too!

The recipe came from here.

Chocolate Cranberry Cookies Mix in a Jar

Layer the following ingredients in order in a 1-quart wide mouth canning jar:

3/4 cup granulated sugar
1/3 cup cocoa powder (clean inside of jar with tissue after this layer)
1/2 cup brown sugar (pack firmly)
1 1/2 cup dried cranberries I used one cup
1 cup chocolate chips
1 3/4 cups all-purpose flour plus 1 teaspoon baking powder plus
1/2 teaspoon baking soda (mixed)

Remember to press firmly between each layer. Place lid and ring onto jar.

Attach the following instructions on a gift tag:

Chocolate Cranberry Cookies

Empty jar of cookie mix into large mixing bowl. Add 1 1/2 sticks butter or margarine, 1 egg, and 1 teaspoon vanilla extract. Mix until completely blended. Shape into balls and place 2 inches apart on sprayed baking sheets. Bake at 375 degrees F for 13-15 minutes.

Makes 2 1/2 dozen cookies.

I was unable to fit all the listed ingredients into the jar. I google chocolate cranberry cookies and found this recipe in the exact same form all over the place, but it still seemed like a lot of cranberries when compared to other recipes I found. So, I cut it down so everything would fit. Hopefully, they still come out delicious!


Photobucket

Saturday, December 26, 2009

Christmas Dinner

Well, the whirlwind that is hosting Christmas is over. We can relax, clean the house (boy oh boy has our "office" fallen into disarray as I have stashed clutter, mail, and crap in there for the past few months), prepare for our New Year's party. WTF am I thinking? Oh yeah, that I love doing this!

Our Christmas menu, in actuality, went like this:
Appetizers:
Spinach Dip (from the Knorr's box, an S family recipe)
Cheese and crackers
Bruschetta (my "famous" Ali's Amazing Bruschetta from allrecipes)

Dinner:
Shrimp Scampi with spaghetti
Corn, broccoli, red pepper mix
Chopped Layer Salad
Pillsbury Grands

Dessert:
Canoli
Fruit
Better than Sex Cake

I have to say, I was VERY impressed with the way the shrimp scampi turned out. Everyone I spoke with (especially my husband) thought it very strange that scampi would have Dijon mustard, but it was a nice hint of flavor. The aforementioned husband told me today he was really impressed with it and that it was REALLY good. We had a little bit of leftovers (7 adults, planning for 8), and they were pretty good reheated too! Definitely will be making that again. Oh, and no communication meant that someone used up the last of our Dijon mustard on a sandwich the day before Christmas, and I learned that no supermarkets are open on Christmas day. Soooo, to the trusty internet I turned, and made homemade Dijon... SO EASY, will definitely do that again too!
Recipe for homemade Dijon mustard:
1 tablespoon dry mustard
1 teaspoon water
1 teaspoon white wine vinegar -- (or 1/2 white wine, 1/2 white vinegar
1 tablespoon mayonnaise
pinch sugar

Mix all ingredients.

Yield: "2 tablespoons"


The Better than Sex cake was made by my husband. I was very glad he made it, since our dessert bringer didn't end up coming, and the backup frozen cheesecake I had in the freezer didn't defrost in time. He didn't quite follow the directions, so the cake would have been way better if served hot and had the toffee on top, but it was pretty tasty anyway.

Everyone seemed happy with the meal, even those picky folks who joke at every holiday about stopping at White Castle on the way home (yes, you read that correctly; it drives me BATTY).

No pictures, alas. Despite cooking the meal and hosting and being pregnant, I was told that I was responsible for taking the pictures for the day. I'm not bitter, but I just didn't get to do the things I might have otherwise as a result.

Hope your December 25 was merry, whether it was spent with family or with Chinese and a movie!!

Saturday, December 19, 2009

Chocolate chip brownies

From The Cookbook Junkie
Chocolate Chip Brownies
Taste of Home Grandma’s Favorites Copyright 2006

1 cup butter, softened
3 cups sugar
6 eggs
1 tablespoon vanilla extract
2 ¼ cups all-purpose flour
½ cup baking cocoa
1 teaspoon baking powder
½ teaspoon salt
1 cup (6 ounces) semisweet chocolate chips
1 cup (6 ounces) vanilla or white chips I used peanut butter chips
1 cup chopped walnuts I omitted these

In a mixing bowl, cream butter and sugar. Add eggs and vanilla; mix well. Combine flour, cocoa, baking powder and salt; stir into creamed mixture just until blended (do not overmix).

Pour into two greased 9-in. square baking pans. Sprinkle with chocolate and vanilla chips and nuts. Bake at 350 degrees for 35-40 minutes or until a toothpick inserted near the center comes out clean. Cool.

Yield 3-4 dozen.

I made these for a faculty meeting I was responsible for helping to bring snacks to. I had a little bit of trouble with the oven, and they had to bake for way longer than advised here, but other than that, these were really easy to make. BAJ really liked them a lot, having at least one the night of, and at least two the next day. As for my colleagues, one of them said that I should become a baker because the brownies were so good. Everyone raved about them and many couldn't believe they were homemade... and by ME!
So, as a result of all that, and the rush I was in getting them done on a weeknight, I didn't get around to taking pictures. I took one on my cell phone before I gobbled it down at the aforementioned faculty meeting, but it looks terrible. Take my word for it, or check out the picture Cookbook Junkie has on her post!

Aunt Teen's Creamy Chocolate Fudge

From allrecipes.com

Ingredients

  • 1 (7 ounce) jar marshmallow creme
  • 1 1/2 cups white sugar
  • 2/3 cup evaporated milk
  • 1/4 cup butter
  • 1/4 teaspoon salt
  • 2 cups milk chocolate chips
  • 1 cup semisweet chocolate chips
  • 1/2 cup chopped nuts
  • 1 teaspoon vanilla extract

Directions

  1. Line an 8x8 inch pan with aluminum foil. Set aside.
  2. In a large saucepan over medium heat, combine marshmallow cream, sugar, evaporated milk, butter and salt. Bring to a full boil, and cook for 5 minutes, stirring constantly.
  3. Remove from heat and pour in semisweet chocolate chips and milk chocolate chips. Stir until chocolate is melted and mixture is smooth. Stir in nuts and vanilla. Pour into prepared pan. Chill in refrigerator for 2 hours, or until firm.
I went to allrecipes the other day, and the featured recipe was this one. It was highly rated by a LOT of people. It looked good, and it looked easy, so I figured I'd go with it. My first time making fudge, this was really very easy. BAJ's mom used to make fudge all the time, so he sort of told me what to expect. This is a very good, basic fudge recipe. I didn't add nuts, and the Fluff I found was 7.5 oz. I think it would have been much better with the nuts, but with a husband who really doesn't like them, I just didn't bother. I sprayed the aluminum with Pam before setting aside; don't know if this made any difference or not, but in the end the fudge came off the paper very easily. I'll be bringing this to my son's daycare as a gift for all the staff; hope they like it!!

Tuesday, December 8, 2009

My helper

Photobucket

Not so Sloppy Joes

I've made this several times before, and really have nothing new to report. The recipe is from Real Simple, and you can google it easily enough.

The reason I wanted to share this for the THIRD time, however, is that it was a meal my TODDLER, who generally refuses meat, ate it. And, he ate the meat part... ALONE...that is, without the roll.

As such, I didn't have enough to make tacos tonight as planned, but we saved the leftovers to feed...THE BOY!! Stellar!

I didn't so much like the look of the red peppers and chose green ones instead. I didn't think they would be as good as the red peppers in this recipe, but it worked just fine. I also used a leftover can of tomato paste; I think I used 2 or 3 T from it. I drained the fat from the turkey too. As a result, I didn't so much end up with a sauce; it was very thick and pastey, so I added a little bit of water. It really didn't affect the taste at all, but I might have liked it to be a little saucey.

I love this ole standby!

Monday, December 7, 2009

Vegetarian Chili

Photobucket

I originally got this recipe from Weight Watchers' Make it in Minutes cookbook. You can find the same recipe here. I love making this because not only is it tasty and easy, but it's a really different flavor than you would find in a typical chili recipe. I made it for lunch club, and no one could believe there was chocolate in there, but knowing that, I can definitely taste it.
So, this is a nice little lunch recipe or a nice something to have in the freezer for a night home alone. Keeper!! :)

Ingredients:

Serves: 4,
Yield:

6
cups

Directions:

Prep Time: 15 mins
Total Time: 30 mins
  1. 1 Heat oil in large saucepan over medium-high heat.
  2. 2 Add garlic, onion, bell pepper, and jalapeno pepper; cook, stirring often, until the vegetables begin to soften, 4-5 minutes.
  3. 3 Add beans, tomatoes, corn, chili powder, cocoa powder, oregano, salt, and black pepper.
  4. 4 Bring to a boil and cook, stirring often to prevent scorching, until beginning to thicken slightly, about 15 minutes.
  5. 5 Remove from the heat and add the chocolate, stirring until melted.

Read more: http://www.food.com/recipe/vegetarian-chili-61515#ixzz1EESh5MfP

Crab Casserole

This is a recipe I received at my bridal shower. I don't know if it's a secret recipe or anything like that, so I won't post it here, but if you really want it let me know!

Photobucket

Tuesday, December 1, 2009

Layered Fiesta Casserole

I found this on my friend Lauren's blog, and since she reviewed it well, and it looked reasonably healthful and easy, I went for it last night. It wasn't exactly PRETTY when I served it, looking more like mush than casserole, so I didn't take any pictures, but it looked pretty enough in the baking pan.

I followed the directions Lauren posted, but I found them to be a little on the confusing side, so if you decide to make this, definitely follow the original directions, which can be found on the Kraft foods website here.

I substituted ground turkey for the beef to make this a little more healthful, but it was really missing something in the flavor department as a result. I was thinking maybe some taco seasoning would have helped, and saw some of the reviews on the Kraft website suggested chipotle seasoning.

In addition to the substitution of turkey, I sprayed the pan with cooking spray first. I don't konw if this made any difference in clean up time or not, but figured it would be a smart move. I used a different brand of salsa, but kept with the thick and chunky theme. I also would probably use a larger dish in the future, since I quickly ran out of room for all of the components in my 9x9 Pyrex.

I thought this was pretty tasty, although I think BAJ considered it too bland, calling it "ok."


Ingredients

  • 1 lb. extra-lean ground beef
  • 1 green pepper, chopped
  • 1 red pepper, chopped
  • 1 jar (16 oz.) TACO BELL® HOME ORIGINALS® Thick 'N Chunky Salsa
  • 1 can (14-1/2 oz.) diced tomatoes, undrained
  • 1 pkg. (10 oz.) frozen corn, thawed
  • 4-6 corn tortillas (12 inch)
  • 1-1/2 cups KRAFT 2% Milk Shredded Sharp Cheddar Cheese, divided

HEAT oven to 375°F.

BROWN meat with peppers in large skillet; drain. Return to skillet. Stir in salsa, tomatoes and corn.

SPREAD 1 cup meat mixture onto bottom of 9x9-inch baking dish; top with 1 tortilla. Cover with layers of the remaining meat mixture and cheese; top with remaining tortillas and meat mixture. Cover with foil.

BAKE 25 to 30 min. or until heated through. Top with remaining cheese; let stand 5 min. or until melted.

Related Posts with Thumbnails