Wednesday, January 11, 2012

Chicken with Mustard Mascarpone Marsala Sauce

What a mouthful!  In my meal planning for the week, I used Giada's Family Dinners.  When I saw this, I added it to the shopping list immediately (c'mon, not only is marsala one of M's favorites, but I had everything but the mascarpone!) and it did not disappoint.  Another big hit for the whole family, this came together easily and was incredibly delicious.  It had many of your typical marsala flavors, but the mustard definitely added something different, interesting, and delicious to the mix.


Chicken with Mustard Mascarpone Marsala Sauce Source:  Giada's Family Dinners by Giada Di Laurentiis via FoodNetwork.com


  • 1 1/2 pounds boneless skinless chicken breasts, each breast cut crosswise into 3 pieces
  • Salt and freshly ground black pepper
  • 2 tablespoons olive oil
  • 5 tablespoons butter, divided
  • 3/4 cup chopped onion
  • 1 pound cremini mushrooms, sliced
  • 2 tablespoons minced garlic
  • 1 cup dry Marsala wine
  • 1 cup (8 ounces) mascarpone cheese
  • 2 tablespoons Dijon mustard
  • 2 tablespoons chopped fresh Italian parsley leaves, plus whole sprigs, for garnish
  • 12 ounces dried fettuccine

Directions

Sprinkle the chicken with salt and pepper. Heat the oil in a heavy large skillet over high heat. Add the chicken and cook just until brown, about 4 minutes per side. Transfer the chicken to a plate and cool slightly.
While the chicken cools, melt 2 tablespoons of butter to the same skillet over medium-high heat, then add the onion and saute until tender, about 2 minutes. Add the mushrooms and garlic and saute until the mushrooms are tender and the juices evaporate, about 12 minutes. Add the wine and simmer until it is reduced by half, about 4 minutes. Stir in the mascarpone and mustard. Cut the chicken breasts crosswise into 1/3-inch-thick slices. Return the chicken and any accumulated juices to the skillet. Simmer, uncovered, over medium-low heat until the chicken is just cooked through and the sauce thickens slightly, about 2 minutes. Stir in the chopped parsley. Season the sauce, to taste, with salt and pepper.
Meanwhile, bring a large pot of salted water to a boil. Add the fettuccine and cook until al dente, stirring occasionally, about 8 minutes. Drain. Toss the fettuccine with 3 tablespoons of butter and season, to taste, with salt and pepper. Swirl the fettuccine onto serving plates. Spoon the chicken mixture over top. Garnish with parsley sprigs and serve.

Tuesday, January 10, 2012

Tortellini with Creamy Tomato Sauce


Ahh, Giada.  I love her cookbooks.  Her recipes are usually quite good, when I can get past how overwhelming they sometimes seem.

This wasn't one that overwhelmed; it just looked good.  Everyone loved it in my house, and the leftover sauce (in the book, but not on the website) was excellent in the Crock Pot Lasagna I made that day.  Deliciousness!!  You really have to try the tomato sauce Giada listed in her book; it's incredible.


Tortellini with Creamy Tomato Sauce Source:  Giada's Family Dinners by Giada Di Laurentiis via FoodNetwork.com

Directions

Bring a large pot of salted water to a boil. Add about 1/4 cup olive oil to the water to help prevent pasta from sticking. Add the ravioli and cook until al dente, stirring occasionally, about 5 minutes. Drain the ravioli, reserving 1/2 cup of the cooking water. Toss the ravioli with the remaining oil to coat.
Meanwhile, bring the marinara sauce to a simmer in a medium saucepan over medium heat, whisking often. Whisk in the ricotta and enough reserved cooking water to thin the sauce to desired consistency. For a thicker sauce, use less pasta water; for a thinner sauce, add more water. Return the sauce to a simmer. Season the sauce to taste with salt and pepper.
Spoon 3 tablespoons of sauce over the bottom of each of 6 bowls. Arrange the ravioli over the sauce.Drizzle the remaining sauce over the ravioli. Sprinkle with the Parmesan and the basil, and serve.

Quick Marinara Sauce, from Giada's Family Dinners by Giada Di Laurentiis

2 – 28 oz. cans whole tomatoes in juice
1 bunch fresh basil, stemmed
½ c. good quality olive oil
2 small onions, minced
4 garlic cloves, minced
1 t. dried oregano
1 t. sugar
1 Parmesan rind (if you can find it; ask the ladies in the cheese department if they have some stashed away – optional)
Salt and freshly ground pepper to taste
In a blender, puree the tomatoes with their juice and the basil until almost smooth.  Set the tomato puree aside.
Heat the oil in a large, heavy saucepan over medium heat.  Add the onions and garlic and sauté until very tender, about 12 minutes.  Stir in the tomato puree, oregano, sugar and optional Parmesan rind.  Bring to a simmer over medium-high heat.  Decrease the heat to medium and continue simmering until the sauce thickens slightly, stirring occasionally, about 10 minutes (I usually let mine go about an hour).  Season the sauce to taste with salt and pepper.  Discard Parmesan rind.
The sauce can be made 1 day ahead.  If storing for future use, cool, then cover and refrigerate or freeze.


Monday, January 9, 2012

Meatless Monday--Tempeh Tacos

I'm often nervous serving my family, my husband in particular, healthful food.  Not that he doesn't want to eat well; he absolutely does.  He's not one, however, to give up anything in taste to save a few calories, be better to the planet, etc.  So, I was really nervous serving something I'd never heard of before (Tempeh), but since the source is a very trusted one (Cook's Illustrated), I figured it was a good place to start.

As soon as he put it in his mouth, he gave a kinda grunt of it being good.  After he told me he really liked it, I told him that it was "pretty good for meat free, huh?"  I then told him what tempeh is--and the five grain tempeh I bought includes soybeans, brown rice, millet, barley, and rye--and after talking about the nutrition information, we concluded that not only was this a tasty dish that took only about 20 minutes to put together, but that it's a reasonably healthful one as well.  I told him the worst stuff on our plates were the cheese and sour cream.

I went to the "fancy" grocery store because I thought I wouldn't find tempeh, but when I was at our regular grocery store, I discovered they carry it as well, right next to their soy products in the produce section.  I assume it's not nearly as hard to find as I anticipated.

Try this.  You'll like it.  You won't miss the meat at all.


I didn't have any tomato sauce, so used 8oz of regular old jarred marinara sauce.

Tempeh Tacos Source:  America's Test Kitchen Light and Healthy 2011 via Indy.com

Serves 6 (2 tacos each)
1 tablespoon canola oil
1 onion, minced
3 tablespoons chili powder
4 garlic cloves, minced
1 teaspoon dried oregano
2 (8-ounce) packages low-fat, five-grain tempeh crumbled into 1/4-inch pieces
1 (8-ounce) can plain tomato sauce
1 cup vegetable broth
1 teaspoon light brown sugar
2 tablespoons minced fresh cilantro
1 tablespoon fresh lime juice
Salt and pepper
12 store-bought taco shells, warmed
1. Heat oil in a 12-inch nonstick skillet over medium heat until simmering. Add onion and cook until softened, about 5 minutes. Stir in chili powder, garlic and oregano until fragrant, about 30 seconds.
2. Add tempeh to skillet; cook until lightly browned, about 5 minutes. Stir in tomato sauce, broth and brown sugar. Bring to simmer; cook until thickened, about 2 minutes.
3. Off the heat, stir in cilantro and lime juice and season with salt and pepper to taste. Divide filling evenly among the taco shells and serve.

Saturday, January 7, 2012

Cook's Illustrated Recommended Tools

If you've been reading this at all, you're aware my love for America's Test Kitchen.  Their recipes are nearly always foolproof (I can only think of one recipe that wasn't to our liking), and my first purchase of their work gave me confidence in the kitchen so that baking was no longer something I couldn't do.  The recipes in their Best 30 Minute Recipe cookbook actually take 30 minutes or less.

The Test Kitchen folks are known for their rigorous testing of recipes, but also give lots of recommendations on products.  They consider not only how well a product performs, but also how affordable the product is.  It seems they're a truly a real home cook's best friend, particularly if that home cook is just starting out.

So, this is a shout out to all the products rated with a "Highly Recommend" by America's Test Kitchen.  Most of these are recent recommendations, coming from my year and three month subscription to Cook's Country magazine.  So, without further adieu, here's the list.  Clicking on the picture will (*should*) take you to the listing of the product.

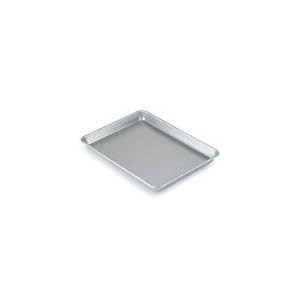
Rimmed Baking Sheet
Sheet Pan Half Size - 12-7/8'' x 17-3/4'' Heavy Duty, 13 Gauge
ATK recommends this as their go-to rimmed baking sheet in the Feb/March 2012 magazine.  They say it deals well with high heat and is incredibly versatile; they use it not only as one would typically use a jelly pan, but that it's even more handy because it can be used for other applications with a cooling rack inside it.

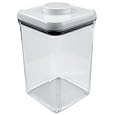
Cookie Jars
Product Details

Also recommended in the Feb/March 2012 magazine, ATK liked the OXO cookie jar because of its tight seal and relative ease for cleaning.  They do warn that the lid is difficult to clean (but how often do you really need to clean the lid for your cookie jar?  Err, maybe I'm just gross....)

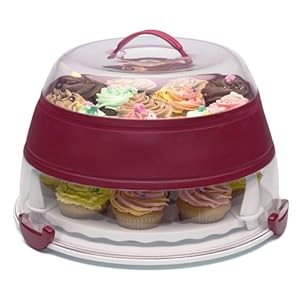
Cake Carrier
Progressive International Collapsible Cupcake and Cake Carrier
ATK rated this in their Dec/Jan 2011 magazine.  They liked the "comfortable handles" and locking system as well as its ability to collapse for storage.  Further, this product can carry not only cakes, but also cupcakes.  Reviewers on amazon, to some extent, complain that the handle is not well made and that they have dropped cakes by holding it only by the handle (to which there were many responses that you should NEVER trust a handle on its own for a cake without supporting it by the bottom).  Another reviewer's response was that he/she thinks CI is "deplorable" and doesn't know why anyone trusts them.  I don't know; I like them (obviously!)

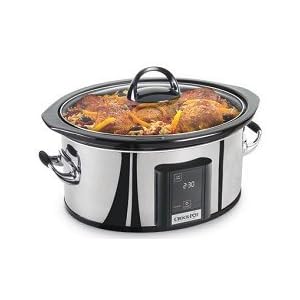
Slow Cooker
Crock-Pot SCVT650-PS 6-1/2-Quart Programmable Touch Screen Slow Cooker, Stainless Steel
Also in their Dec/Jan 2011 issue, Cook's Country recommends the Crock Pot Touchscreen Slow Cooker.  They like the 6qt size, its keep warm setting, and a power light.  Further, the crock is dishwasher safe (!!) and has its own handles to easily remove it from the base using potholders.

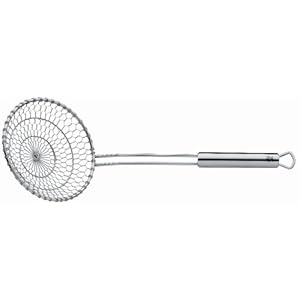
Spider Skimmers
Stainless-Steel Wok Skimmer
In Feb/Mar 2011, Cook's Country tested spider skimmers.  This 13cm skimmer was their pick because of its ease of use and cleaning as well as the angled handle and deep basket.

Muffins Tins
In the Feb/Mar 2011 issue, Cook's Country didn't rank any muffin tin as "Highly Recommended," but they did rate several as "Recommended."

  • First, Wilton Avanti Everglide.  They like its wide rims and ease of gripping, even with thick oven mitts, its durability, and its nonstick coating.  They also commented on its "acceptably even--though not stellar" browning and its low price.
  • Next, the Norpro Nonstick 12-Muffin Cupcake Pan, which got high marks for its relatively even browning and easy release, but got low marks for construction.  It has but one extended rim, which oddly enough is on a long side.  CC says it was hard to hold.
  • The Anolon Advanced Bakeware 12-Cup Muffin Pan had "good 'grab-ability,'" silicone handles, and a raised lip, but is more expensive than the others listed and also got the same rating in browning as the Wilton.
  • Finally, Bonjour Commercial Nonstick Bakeware 12-Cup Muffin Pan got high marks for its cupcake performance, but its rating was lowered because blueberry muffins clung to the pan and of its "not generous" handles.  It also has the same price as the Anolon.

So there you have it; some of the best rated cooking equipment from the folks at America's Test Kitchen!

Wednesday, January 4, 2012

Overnight Egg Casserole

When it comes to breakfast, many of us just grab and go.  Fast is the name of the game, but we know that fast generally results in the hungry monster making an appearance at 9 (oh wait, is that just me?).  Something that can be made ahead and baked  while doing other things or fully cooked and heated in the microwave is a perfect solution.  I've recently learned that protein helps keep that monster at bay by making us feel fuller longer, so I've been looking for ways to incorporate "The incredible, Edible Egg" into my morning routine.

This meal, made for our Breakfast for Dinner New Year's Eve party, is a perfect solution.  It combines carbs in the potatoes with protein in the ham and eggs, plus is adaptable enough that one could easily add some veggies--broccoli seems the perfect fit here.

I made it yesterday morning, baked it around dinner time, and it was really good.  This morning, I warmed it in the microwave, and it was still just as good.  So the only time you'd need in your manic Monday morning is to slop it on a plate, nuke it for 30 seconds, and eat it.  It's not the most grab and go of breakfasts, but it still is really fast.

A little secret; it made me so happy to have a use for my leftover Christmas ham!!


Overnight Egg Casserole Source:  Taste of Home's Simple and Delicious March/April 2006.  Online here.


Ingredients

  • 4 cups frozen shredded hash brown potatoes, thawed
  • 1 cup cubed fully cooked ham
  • 1 can (4 ounces) chopped green chilies
  • 1/2 cup shredded Monterey Jack cheese
  • 1/2 cup shredded cheddar cheese
  • 6 eggs
  • 1 can (12 ounces) evaporated milk
  • 1/4 teaspoon pepper
  • Salsa, optional

Directions

  • In a greased 8-in. square baking dish, layer the hash browns, ham, chilies and cheeses. In a large bowl, whisk the eggs, milk and pepper; pour over the casserole. Cover and refrigerate overnight.
  • Remove from the refrigerator 30 minutes before baking. Bake, uncovered, at 350° for 1 hour or until a knife inserted near the center comes out clean. Let stand for 5-10 minutes. Serve with salsa if desired. Yield: 9 servings.

Monday, January 2, 2012

Bacon and Cheese Strata

Continuing the Breakfast for Dinner we had for New Year's Eve, I also made this Bacon and Cheese Strata from Delish.com.  I ended up not having a 9x12 pan, so made it in two 8x8 pans; this meant I had one for NYE and one for today! 

It looked so pretty when it came out of the oven.

and was really delicious too.  The Dijon mustard was a really interesting twist, and it was cheesey and gooey and so yum.  So easy to put it together, and so tasty too!


Bacon and Cheese Strata Source:  Delish.com
  • 6 slice(s) bacon
  • 2 tablespoon(s) Dijon mustard
  • 12 slice(s) firm white bread
  • 6 ounce(s) Gruyère cheese, shredded
  • 9 large eggs
  • 3 cup(s) whole milk
  • 1/2 teaspoon(s) salt
  • 1/4 teaspoon(s) freshly ground black pepper

Directions
  1. Lay strips of bacon on a foil lined baking sheet so that they don't overlap.  Bake for 18-20 minutes at 375 degrees.  Let cool and coarsely crumble bacon.
  2. Meanwhile, grease 13" by 9" ceramic or glass baking dish.
  3. Spread mustard on 1 side of each bread slice. Arrange 6 bread slices, mustard side up, in bottom of baking dish, cutting slices to fit if necessary. Sprinkle with half of cheese. Top with all but 2 tablespoons crumbled bacon, then remaining bread slices, mustard side up.
  4. In large bowl, with wire whisk, beat eggs, milk, salt, and pepper until blended. Slowly pour egg mixture over bread slices; press bread down to help it absorb egg mixture. If necessary, spoon egg mixture over any uncoated bread. Top with remaining cheese and bacon. Let stand at room temperature 15 minutes or cover and refrigerate overnight.
  5. Preheat oven to 350° F. Bake strata 40 minutes or until puffed and golden and knife inserted in center comes out clean. Let stand at least 10 minutes before serving.

Meal Plan Monday

Monday--Tempeh Taco (Cook's Illustrated Light and Healthy)
Tuesday--Clear out the fridge night
Wednesday--Mac and Cheese (Cook's Illustrated) with Artichoke and Pea Gratin
Thursday--Cajun Stuffed Peppers
Friday--Crock Pot Lasagna
Saturday--Chicken Marsala with Mustard and Mascarpone
Sunday--Ravioli with Creamy Tomato Sauce

Have a great week!

Sunday, January 1, 2012

Syrupy Banana French Toast

We had some friends over for a very low key New Year's Eve gathering.  We've done this since 2007 when our first son was born, and invited others interested in a low key, bring along the kids, night.  On the evite, I asked everyone what their preference for dinner was--Mexican or Breakfast?  Breakfast was the winner, and so I turned to the internet to find make ahead breakfast dishes that would be kid friendly and delicious.  I came across Good Housekeeping's recipe site Delish and found many recipes that seemed perfect.

First up is the all around favorite, Syrupy Banana French Toast.  This was so easy and so yummy.  I put it together on Saturday morning and it was ready to go for dinnertime.  The brown sugar and butter "crust" caramelized so that it didn't even need the addition of syrup.  I used a French baguette, which meant that the 1" slices of bread were way too much for this dish; next time I'll either use thinner slices of baguette or a loaf of French bread.

I toyed with the idea of throwing in some chocolate chips, because banana chocolate chip pancakes are so yummy, but instead made the recipe as written.  One note is that this does not reheat well.  We tried to have it this morning for breakfast and found it was pretty disgusting.

Yummmmmmmm

Syrupy Banana French Toast Source:  Delish.com
  • 6 tablespoon(s) butter or margarine
  • 1 1/2 cup(s) packed brown sugar
  • 5 large ripe bananas, cut diagonally into 1/2-inch-thick slices
  • 1  (12-ounce) long loaf French or Italian bread, cut crosswise into 1-inch-thick slices
  • 6 large eggs
  • 2 cup(s) milk
  • 2 teaspoon(s) vanilla extract
  • 1 teaspoon(s) ground cinnamon
  • 1/2 cup(s) sliced almonds or coarsely chopped walnuts or pecans

Directions
  1. In microwave-safe small bowl, heat butter in microwave oven on High 1 minute or until melted. Stir sugar into butter until moistened. With fingertips, press sugar mixture onto bottom of 13-inch by 9-inch glass baking dish. (It's okay if mixture does not cover bottom.) Spread fresh or dried fruit over sugar mixture; top with bread slices, cut sides down.
  2. In medium bowl, with whisk, beat eggs; whisk in milk, vanilla, and cinnamon. Slowly pour milk mixture over bread; press bread down to absorb egg mixture. Sprinkle with nuts. Cover with plastic wrap and refrigerate at least 2 hours or overnight.
  3. Preheat oven to 350 degrees F. Remove plastic wrap from baking dish. Bake, uncovered, 45 to 50 minutes or until bread is golden brown and knife inserted in center comes out clean. Let stand 10 minutes before serving.

    Note: If you don't have bananas, substitute 3 to 4 very ripe pears or peaches (about 1 1/2 pounds), sliced; or 1 cup dried cherries, cranberries, or raisins.

Thursday, December 29, 2011

Rock Soup

A few years ago, I was a subscriber to the Rachael Ray magazine.  Around Christmastime, there was a recipe called Rock Soup, for ham leftovers, which happened to coincide with my having a ton of leftover Christmas ham.  This is a delicious (and not split pea soup) way to use up leftover ham, or you could even just use a ham steak or whatever you have.

This came together fairly quickly and was really easy to make.  It had a ton of flavor, even though I went easy on the hot sauce, and went really well with the leftover bread I used too (Pumpernickel and rye).  I even have a bunch leftover in the freezer for a rainy day or even for lunch club when my turn comes up!


Sopa de Pedra from Everyday with Rachael Ray December/January 2008

Ingredients

  • 2 tablespoons extra-virgin olive oil (EVOO), plus more for drizzling
  • 1/2 pound chorizo, ham or leftover meat, chopped
  • 2 large baking potatoes, peeled and cut into cubes
  • 4 ribs celery, chopped
  • 3 to 4 carrots, chopped
  • 1 large onion, chopped
  • 2 to 3 cloves garlic, chopped
  • 1 bay leaf
  • Salt and pepper
  • One 15.5-ounce can chickpeas, drained
  • 1 teaspoon sweet smoked paprika
  • 6 cups chicken broth
  • One 15-ounce can diced tomatoes or tomato sauce
  • 2 tablespoons hot pepper sauce
  • 2 cups cubed stale bread
  • Chopped flat-leaf parsley, for garnish

Directions:

  1. In a soup pot, heat 2 tablespoons EVOO, 2 turns of the pan, over medium-high heat. Add the chorizo and cook for 2 minutes. Add the potatoes, celery, carrots, onion, garlic and bay leaf; season with salt and pepper. Cook, stirring frequently, until the vegetables are softened, 7 to 8 minutes.
  2. Add the chickpeas and season with the paprika. Stir in the chicken broth, tomatoes and hot sauce and bring to a boil, about 6 minutes. Lower the heat and simmer until the potatoes are tender, 10 to 15 minutes.
  3. Place 1/2 cup bread cubes in each of 4 bowls and drizzle with EVOO. Pour in the soup; top with parsley.

Saturday, December 24, 2011

Christmas Dinner Plan

Appetizers:
Spinach Dip in Bread Bowl
Cheese and crackers
Shrimp Ring
Something else I can't remember

Main:
Salad
Ham
Sweet Potatoes
Mashed Potatoes
Green Beans
Grands Biscuits

Dessert:
Being brought

One day, we will have something different in the appetizer department and maybe we won't have ham....

Thursday, December 15, 2011

Italian Hot Dog

My husband requested Italian hot dogs for dinner once last week, and not really knowing what all this entailed, I turned to my friend, Google.  I found a "New Jersey" Italian hot dog on Simply Recipes that looked delicious.

I don't typically like a lot of stuff on my dogs; mustard and an occasional sauerkraut are sufficient for me.  But boy, throw some peppers and onions on top and you've got yourself a really tasty dog.  My husband commented that this wasn't *quite* was he was looking for when he requested Italian hot dogs, but that it was really good anyway.


Italian Hot Dogs Simply Recipes

  • 1/4 cup olive oil
  • Salt
  • 2 pounds potatoes, peeled and cut into 1/2 inch chunks
  • 2 medium green peppers, sliced into strips
  • 1 large yellow or white onion, sliced into strips
  • 1 teaspoon Italian seasoning, or a mixture of oregano, basil and rosemary
  • 8 beef hot dogs, preferably with natural casings
  • 4 sandwich buns
  • Mustard

METHOD

1Heat the olive oil in a large frying pan or skillet or griddle until it shimmers. Put the potatoes in the pan in one layer and fry on medium-high heat for 2-3 minutes without touching them. Use a metal spatula to scrape the potatoes off the bottom of the skillet, flipping them. Sprinkle salt over the potatoes, and cook for another 2-3 minutes without touching them.
2 Remove the potatoes, which should be partially browned, to a bowl and set aside. Turn the heat to high and add the peppers and onions. Arrange evenly in the pan and cook for 2-3 minutes without touching them. Sprinkle salt over them, then flip and cook for another 2-3 minutes untouched. There should be some browned and even blackened bits here and there. Add the Italian seasoning and the potatoes to the pan, stir to combine and cook over medium-high heat until they are soft and nicely browned, about 8-10 minutes.
3 Heat a grill or a frying pan to cook your hot dogs; don't boil your dogs for this recipe. Grill or fry until they are done to your liking and set aside.
4 Liberally smear mustard on both sides of the sandwich roll. Add two hot dogs per roll and top with as much of the potatoes, peppers and onions as will fit. Serve at once.

Wednesday, December 14, 2011

Nutter Butter Snowmen

I was looking for something to bring to a holiday party this weekend, and went to Brown Eyed Baker's blog to see what she had up.  She'd recently posted this recipe, which looked so fun, sweet, and easy that I went for it.

Not only were they fun, sweet, and easy, but they were a perfect afternoon baking activity for my four year old and me.  We had a ton of fun "gluing" the M&Ms as well as sneaking them, and decorating them too.  In addition, they were a big hit at the party!

I have to admit, the orange Tic Tac was a little weird with the other flavors, so next time I might use orange frosting instead.


Nutter Butter Snowmen my pretty purse via Brown Eyed Baker

1. Line a baking sheet with wax paper; set aside.
2. In a small to medium bowl, melt the white candy melts according to the package instructions.
3. Working one at a time, dip a Nutter Butter cookie into the melted coating and flip it over to coat completely (a fork is great for this). Remove and let any excess drip off then place on the wax paper-lined baking sheet. Repeat with the remaining Nutter Butter cookies. Place the baking sheet into the refrigerator for at least 30 minutes so the coating can set.
4. Attach a small decorating tip (I used a #2) to a pastry bag and fill with black icing (I just used Wilton decorating icing to make it easy). Dab a small amount on one side of an M&M and place on the coated cookie. Repeat with another just below to make the two “buttons”.
5. Dab another small amount on the bottom of half of a Tic Tac and affix to the center of the top of the cookie for the nose. Again, repeat.
6. Now squeeze out small dots for the eyes and the mouth. 

Chicken Tamale Casserole

Sometimes, I just get a craving for Mexican food.  Sometimes, I have no idea what to make for dinner, and a recipe lands in my lap that solves that problem.  Sometimes, both happen and all is right with the world.

This recipe was that recipe.  I was able to use things I had in my pantry--the whole roast chicken I'd planned for one thing that didn't end up happening and so roasted (poorly) after trying to cut it into pieces, the cornbread mix I had around from something I'd planned that didn't end up happening-- as well as have enough leftovers to bring in for lunch club.  Total, and complete, score.

Of course, it's only made better because it was so very good.  The enchilada sauce I chose had some spicy in it, but mixing in sour cream satisfied my spicy hating son.  I got compliments from the ladies in lunch club, who got it as leftovers (I was nervous about how well it would reheat, but it was just as good, if not better, on day 2).


Chicken Tamale Casserole Cooking Light November 2008 via Myrecipes

  • 1 cup (4 ounces) preshredded 4-cheese Mexican blend cheese, divided
  • 1/3 cup fat-free milk 
  • 1/4 cup egg substitute 
  • 1 teaspoon ground cumin
  • 1/8 teaspoon ground red pepper
  • (14 3/4-ounce) can cream-style corn 
  • (8.5-ounce) box corn muffin mix 
  • (4-ounce) can chopped green chiles, drained 
  • Cooking spray 
  • (10-ounce) can red enchilada sauce 
  • 2 cups shredded cooked chicken breast 
  • 1/2 cup fat-free sour cream 

Preparation

  1. 1. Preheat oven to 400°.
  2. 2. Combine 1/4 cup cheese and next 7 ingredients (through chiles) in a large bowl, stirring just until moist. Pour mixture into a 13 x 9–inch baking dish coated with cooking spray.
  3. 3. Bake at 400° for 15 minutes or until set. Pierce entire surface liberally with a fork; pour enchilada sauce over top. Top with chicken; sprinkle with remaining 3/4 cup cheese. Bake at 400° for 15 minutes or until cheese melts. Remove from oven; let stand 5 minutes. Cut into 8 pieces; top each serving with 1 tablespoon sour cream.

Tuesday, December 13, 2011

Meatless Monday: Vegetarian Chili


My husband was not to be home for dinner the other night, so as we were traveling and I was doing my meal plan, I asked my four year old what he'd like:  vegetarian chili, beef stew, or something with sweet potatoes.  He said he wanted chili, red chili.  So, I found a new red chili recipe to try.

I came across this one from Emeril on Ezra Pound Cake's blog, and her review made me want to try it for sure, in addition to the fact that Emeril's recipe came up in my initial search for vegetarian recipes as highly rated. 

First of all, I wish I had used my better judgment and used canned diced tomatoes instead of the December tomatoes from the store.  Hard as rocks and utterly devoid of flavor, they added little to the recipe.  Since I was cooking for Mr. "It's too spicy," I skipped the serrano pepper (the little sign in the grocery store said HOT!) in favor of some jarred sliced jalapenos I always have in the fridge.  I tossed in more than I might have otherwise, after he enjoyed a spicy to my palate Chicken Tamale Casserole into which I'd mixed sour cream.  He said he liked it at first, and then refused to eat it after about 10 bites.  Yes, seriously.

Anyway, this was REALLY good.  Not the typical chili recipe, but really good nonetheless.  I added lots to it in the way of toppings:  avocado, shredded Mexican cheese, and sour cream, and they were super yummy.

Vegetarian Chili Source:  Emeril Lagasse, via Ezra Poundcake
Makes 6 to 8 servings
  • 2 tablespoons canola oil
  • 1 1/2 cups chopped yellow onions (about 3 small onions)
  • 1 cup chopped red bell peppers
  • 2 tablespoons minced garlic
  • 3T diced jarred jalapenoVeg
  • 1 medium zucchini, stem ends trimmed and cut into small dice
  • 2 cups fresh or frozen corn kernels (about 3 ears)
  • 1 1/2 pounds portobello mushrooms (about 5 large), stemmed, wiped clean and cubed
  • 2 tablespoons chili powder
  • 1 tablespoon ground cumin
  • 1 1/4 teaspoons salt
  • 1/4 teaspoon cayenne
  • 4 large tomatoes, peeled, seeded and chopped
  • 3 cups cooked black beans (or 2 15-ounce cans of black beans), rinsed and drained
  • 1 (15-ounce) can tomato sauce
  • 1 cup vegetable stock or water
  • 1/4 cup chopped fresh cilantro leaves (do not add to the pot if you’re planning to freeze chili)
  • Optional additions: cooked brown rice, sour cream, Greek yogurt, diced avocado, chopped scallions
  1. In a large, heavy pot or Dutch oven, heat the oil over medium-high heat.
  2. Add the onions, bell peppers, garlic, and serrano peppers, and cook, stirring, until soft, about 3 minutes.
  3. Add the zucchini, corn, and mushrooms, and cook, stirring, until the vegetables give off their liquid and start to brown around the edges, about 6 minutes.
  4. Add the chili powder, cumin, salt and cayenne, and cook, stirring, until fragrant, about 30 seconds.
  5. Stir in the tomatoes.
  6. Add the black beans, tomato sauce and vegetable stock, stir well, and bring to a boil. Reduce the heat to medium-low and simmer, stirring occasionally, for about 20 minutes.
  7. Remove from the heat, and stir in the cilantro. Adjust the seasoning, to taste.
  8. To serve, place 1/4 cup of brown rice in the bottom of each bowl. Ladle the chili over the rice, and top with whatever garnishes you choose. Serve immediately.

Monday, December 12, 2011

Skillet Macaroni and Cheese

Have you yet checked out Best 30 Minute Recipes from Cook's Illustrated?  If not, you should do it.  Go to your library, add it to your Christmas list....  I tried a bunch of recipes in the time I had the book, and there was only one that my family wasn't raving about. 

This may be the best macaroni and cheese I've ever made.  My husband, who doesn't really like macaroni and cheese liked it...  that says a lot!  And how many macaroni and cheese recipes do YOU know that really, truly, honestly, absolutely take 30 minutes?  Even if you're a disorganized, odds are good you forgot something, cook like me? 

Skillet Macaroni and Cheese Best 30 Minute Recipes by Cook's Illustrated via Recipe Swap Blog at Syracuse

3½cups water, plus more as needed
1 (12 ounce) can evaporated milk
12 ounces elbow macaroni (3 cups)
Salt and pepper
1 teaspoon cornstarch
½ teaspoon dry mustard
¼teaspoon Tabasco sauce
2 cups shredded cheddar cheese
2 cups shredded Monterey Jack cheese
3 tablespoons unsalted butter
Bring water, 1 cup of evaporated milk, the macaroni and ½teaspoon salt to simmer in 12-inch nonstick skillet over high heat. Cook, stirring often, for 8-10 minutes or until macaroni is tender.
Whisk together remaining ½ cup evaporated milk, cornstarch, mustard and Tabasco, then stir into skillet. Simmer until slightly thickened, about 1 minute.
Take skillet off heat and stir in cheeses, 1 handful at a time. Add additional water if needed, if sauce gets too thick. Stir in butter and season to taste with salt and pepper.
Variations: Add 4 ounces deli-style baked ham, diced medium, and ½ cup frozen peas with the cornstarch mixture in step 2. Or, for spicy mac and cheese, add 2 teaspoons minced chipotle chiles in adobo sauce and 1 (10 ounce) can Rotel tomatoes, drained, with cornstarch mixture in step 2.

Sunday, December 11, 2011

Spanish Roasted Red Pepper Sauce

Recently, a friend of mine had her second baby in less than two years, and was really struggling.  I wanted to bring food to help her out.  Since they are vegetarians, I asked my friend Lishie, who is a former veg and has a veg sister, for some inspiration for food that would travel and/or freeze well.
She gave me a few suggestions, and this is the one I chose.

What a wonderful way to use up or take advantage of the bounty of summer produce.  This was really easy (once I figured out an easy and effective way to roast the peppers) and quite tasty.  It's such a basic recipe, you could easily spice it up by adding some crushed red peppers, or change the flavor with some easy additions (mushrooms?  green peppers?)  Lishie suggested making a lasagna using this sauce, which sounds outrageously good!

Spanish Roasted Red Pepper Sauce Delish

  • 5 red peppers
  • 3 medium tomatoes or 14 oz tomato sauce
  • 1 small Onion, diced
  • Olive Oil
  • 3 TBSp Heavy Cream
  • S & P

Place the red peppers & the tomatoes on a baking sheet & sprinkle with olive oil. Roast them under the broiler until they are blackened, roasted. Allow to cool.


Transfer the veg to the food processor & puree with a little more olive oil.


Meanwhile, saute the onion is a sauce pan on medium-high. Add the pureed mixture & stir. When the sauce is nearly heated through, add the cream. Add S & P to taste.

Saturday, December 10, 2011

FOUR YEARS???

Wow, I just realized that the fourth anniversary of my first post was this week (December 5).  This blog has been an incredible resource for me, even if not another soul ever looks at it.  I started because the trend on a message board I was reading was to do it.  Yep, the bandwagon.  But really, I wanted to find a better way to organize all the recipes we've tried and loved so that I could access them from anywhere--and this was before I had a smartphone.  Now that I do have a smart phone, I don't wander the grocery store as aimlessly on those nights I don't have a plan for dinner.  Instead, I bring up my website, and instantly have an easy recipe to shop for.

Another way in which it's been a resource for me is that it's challenged me to step outside of my comfort zone.  It's very rare for us to have a meal again.  For better or worse, the challenge to try something new--a new technique, a new recipe, even a new food, is present because I want to blog about it.

On another message board, there's been criticism of bloggers like me.  One person commented that the only food blogs she reads are those with truly original recipes or really beautiful photography.  This bothered me at first, because I have neither of those.  Ever.  But then I stepped back and thought about why I'm doing this.  First, I'm doing this for me--to have all my recipes (and thoughts about them) in one place, to inspire or challenge myself in some new way and to grow (geez, without this, I'd never have tried to conquer the recipes of Dorie Greenspan or some of the other challenges in which I've partaken).  Second, maybe there IS someone who will read this and find my comments and bad photography useful.  If not, that's totally cool because the ultimate goal is part one, but if it does help another person, how could it be bad?

So, happy birthday, "Tales from the Mad Men Kitchen," formerly known as "Nothing to See Here."   You've been super awesome for me!

Pumpkin Spice Latte Cupcakes

For a co-worker's birthday in October, she requested cupcakes.  When I asked what kind, she said any.  So, I went with something that caught my eye and sounded like something *I* would like.  Turns out, pumpkin is one of her "favorite things ever," and I made a perfect choice.  Score!

These were outrageously good.  My coworkers told me I should open a cupcake business (little do they know how unskilled in the kitchen I really am).   They had that perfect flavor of the Starbucks fall treat to which I used to be addicted (until I realized how much I don't like Starbucks and thus how much cream and sugar it required to make it taste good to me as well as how big a dent such an addiction was putting in my wallet!)

I happened to have been drinking Dunkin Donuts Pumpkin Spice coffee the week I made these, so I added that additional flavor to it when I brushed that flavor of coffee over top, but any coffee (or maybe caramel, cinnamon, whatever) would add an additional treat too.

A perfect fall treat!
Shout out to my friend Lishie for the B Movie zombie plate!
Pumpkin Spice Latte Cupcakes Annie's Eats
Yield: about 2 dozen cupcakes
Ingredients:
For the cupcakes:
2 2/3 cups all-purpose flour
3 tbsp. espresso powder
2 tsp. baking soda
2 tsp. baking powder
1 tsp. ground cinnamon
1/8 tsp. grated nutmeg
1/8 tsp. ground cloves
1 tsp. salt
1 (15 oz.) can pumpkin puree
1 cup sugar
1 cup brown sugar
1 cup canola or vegetable oil
4 large eggs
½ cup coffee or espresso, for brushing
For the whipped cream:
2¼ cups heavy cream, chilled
¼ cup confectioners’ sugar
For garnish:
Ground cinnamon
Caramel sauce
Directions:
To make the cupcakes, preheat the oven to 350°F.  Line cupcake pans with paper liners.  In a medium bowl, combine the flour, espresso powder, baking soda, baking powder, cinnamon, nutmeg, cloves and salt.  Stir together and set aside.  In the bowl of an electric mixer, blend together the pumpkin, granulated sugar, brown sugar and oil. Add the eggs one at a time, beating well after each addition.  With the mixture on low speed, add the flour mixture in two additions, mixing just until incorporated.
Fill the cupcake liners about three-quarters full.  Bake until the cupcakes are golden and a toothpick inserted into the center comes out clean, 18-20 minutes.  Transfer the pans to a wire rack and let cool for 10 minutes, then remove the cupcakes from the pans.  While the cupcakes are still warm, brush them two or three times with the coffee or espresso, allowing the first coat to soak in before repeating.  Let cool completely.
To make the frosting, place the heavy cream in the bowl of an electric mixer fitted with the whisk attachment.  Whip on medium-low speed at first, gradually increasing to high speed.  Blend in the confectioners’ sugar gradually.  Whip until stiff peaks form, being careful not to over-beat.  Use a pastry bag fitted with a decorative tip to frost the cooled cupcakes.  Sprinkle with ground cinnamon and drizzle with caramel sauce.  Store in an airtight container and refrigerate.
Source: cake adapted from Williams Sonoma


Creamy Shiitake Alfredo

Oh, my blog, I've missed you.  I'm sure I'll fall behind again, take pictures of every new thing I make, forget what I thought about them, and be back here again.  At any rate, let's catch up.

A few months ago, the guys at The Bitten Word ran a contest to win a subscription to Everyday Food.  By some stroke of changing luck, I won!  I love this little meal because it's... Everyday and I can even use it... every day.  Not fussy, easy meals, that don't take long to make, complete with beautiful food photography, and a design that, if I had time/interest in scrapbooking, I'd use as inspiration for my scrapbook pages.

This is one recipe I discovered in this magazine.  Of course, their food photography looks a million times better than mine, so see how it's supposed to look in a photograph here.

We really enjoyed this.  The boys weren't nuts about the mushrooms, but my husband and I really loved the flavor they brought.  According to the time stamp on the photo, we had this on October 29.  A while ago.  But I know we liked it.  The recipe states it take 50 minutes from start to finish, and I can't remember at all, but I do know that I made it on a weeknight, so perhaps it wasn't so very bad to do...


Creamy Shiitake Alfredo Everyday Food November 2011

Ingredients

  • Coarse salt and ground pepper
  • 3/4 pound fusilli or other short twisted pasta
  • 2 tablespoons unsalted butter
  • 3 small shallots, thinly sliced
  • 3 garlic cloves, minced
  • 1 pound shiitake mushrooms, stemmed and thinly sliced
  • 2 tablespoons chopped fresh thyme leaves
  • 1/2 cup dry white wine, such as Sauvignon Blanc
  • 3/4 cup heavy cream
  • Grated Parmesan, for serving

Directions

  1. In a large pot of boiling salted water, cook pasta according to package instructions. Drain.
  2. Meanwhile, in a large skillet, melt butter over medium-high. Add shallots and garlic and cook, stirring, until shallots are translucent, about 5 minutes. Add mushrooms and thyme and cook until mushrooms are tender, about 2 minutes. Add wine and cook until liquid is reduced by half, about 2 minutes. Reduce heat to low, stir in cream, and cook until warmed (do not let boil). Season with salt and pepper. Add pasta to skillet, toss to combine, and top with Parmesan.

Related Posts with Thumbnails