Showing posts with label kid friendly. Show all posts

Thursday, March 21, 2013

BBQ Chicken Pockets

Stephanie's Chicken Suiza pockets (which I, apparently, never blogged; see Stephanie's recipe here) were such a wild success around here, I knew we'd have another hit when she posted this recipe for BBQ Chicken Pockets.

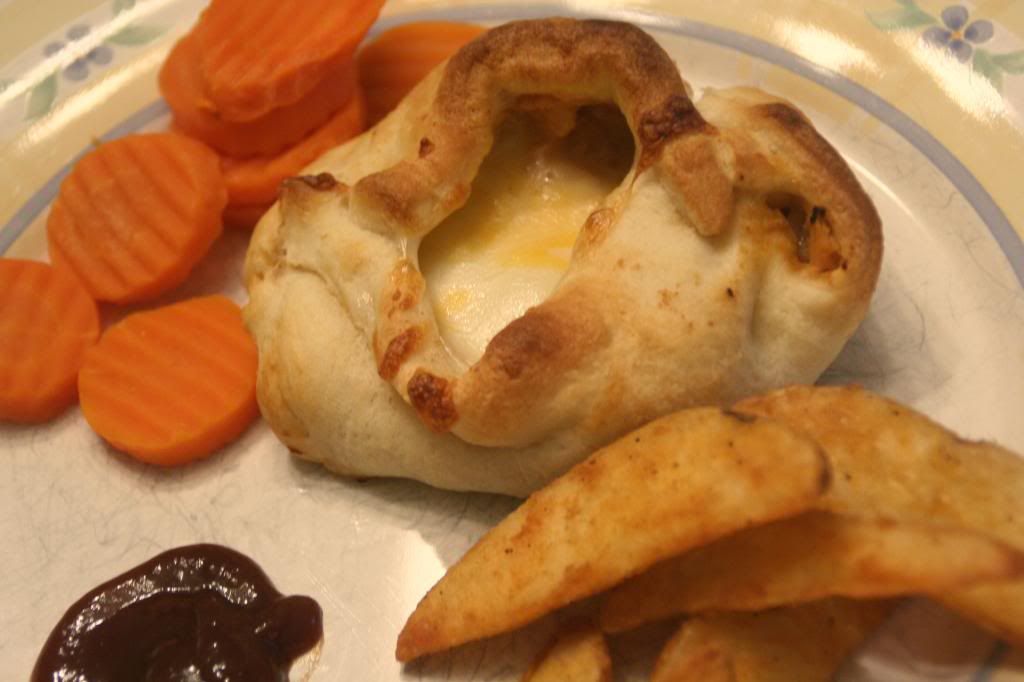
And these were a big hit indeed!  We all loved the flaky deliciousness and the tasty innards.  I made mine like a pocket while Stephanie made them more like rolls; either way you make them, make sure you double the recipe (they freeze really well and make a fast meal) because the as written didn't feed my little family--they just could not get enough!

I served with steak fries and barbecue dipping sauce and some carrots on the side.

BBQ Chicken Pockets Source:  Stephanie Cooks

Ingredients:
1 tsp olive oil
6 ounces cooked chicken, diced
Salt/pepper
BBQ sauce
1 can crescent rolls
Cheddar cheese
Mozzarella cheese
Cilantro, optional

Directions:
  1. Preheat your oven to 400 degrees.  Combine chicken and 2T BBQ sauce in a small skillet. Cook, stirring frequently, until warm and coated well.  Set aside and keep warm.
  2. Form rectangles with the crescent roll dough by sealing two triangles together.  Coat with BBQ sauce as thickly as you like (I wouldn't go too thick or they will be gooey).
  3. Place equal amounts of chicken on each rectangle.  Top with cheeses.
  4. Form a pocket around the filling, making sure the filling can't escape through any holes.  Place on a baking sheet, and bake in the preheated oven for about 12 minutes, until lovely and golden.  
  5. Top with cilantro and enjoy!

Tuesday, June 12, 2012

Blueberry Maple Oatmeal

Breakfasts are hard for me.  You probably have the same problem; you're rushing out the door or have limited time to get ready and just don't want to have to make something for breakfast.  Cold cereal fits the bill perfectly, but you know it's not that good for you and you're hungry by 10 anyway.

I found this recipe while browsing on Pinterest; it was originally posted on The Yummy Life.  It fits the bill perfectly; not only is it pretty good for you, but it also kept me full until nearly lunchtime.  I really enjoyed it, and my four year old loved it so much that he remembered to tell me about it when he got home from school.

I used blueberries that I had bought fresh and frozen, and they worked perfectly.  They defrosted overnight and were the perfect texture; I don't know if store bought frozen blueberries would become too mushy in this or not.

The only problem with this recipe is remembering to make it the night before (The Yummy Life advises not making it more than 2 days in advance).  Otherwise, it's a perfect solution to our breakfast problem!

Pardon the poor photography.  Many shots and this was the best.  Thanks, Picnik, for helping it look a tiny bit better.


Blueberry Maple Refrigerator Oatmeal Source: The Yummy Life
  • 1/4 cup uncooked old fashioned oats
  • 1/3 cup skim milk
  • 1/4 cup low-fat Greek yogurt
  • 1-1/2 teaspoons dried chia seeds
  • 2 teaspoons maple syrup (more or less to taste)
  • 1/4 cup blueberries (or enough to fill jar)

Directions
In a half pint (1 cup) jar, add oats, milk, yogurt, chia seeds, and maple syrup. Put lid on jar and shake until well combined; give it more than you think--the yogurt stays pretty clumpy. Remove lid, add blueberries and stir until mixed throughout. Return lid to jar and refrigerate overnight or up to 2 days. Eat chilled.

Tuesday, May 31, 2011

Coconut Shrimp with Pineapple Salsa

I've made this one a few times before, and have never taken great pictures of it.  So, it gets another blog post.  This time around, it was made by my hubby, though I did jump in and help him out somewhere along the way.  We didn't have any red onion, so just left that out, and it was still really tasty.

Nonetheless, the 3 year old wouldn't eat any.  Can you say, "Power struggle?"  Yeah.  The 1 year old, however, went to TOWN on these.  As for M and I, we both enjoyed it a lot, and it was especially made by the pineapple salsa; it was fabulous and really brought out the flavor of the coconut.  Yummm!


The All New Complete Cooking Light Cookbook, p 255

Shrimp:
28 large shrimp
1/3c cornstarch
3/4t salt
1/2-3/4t ground red pepper
3 large egg whites
1-1/2c flaked sweetened coconut
Cooking spray

Salsa:
1c finely chopped fresh pineapple
1/3c finely chopped red onion
1/4c finely chopped fresh cilantro
1/4c pineapple preserves
1-1/2T fresh lime juice
1T finely chopped seeded jalapeno pepper
1/4 black pepper

1. Preheat oven to 400.
2. To prepare shrimp, peel and devein, leaving tails intact. Rinse shrimp in cold water; drain on paper towels.
3. Combine cornstarch, salt, and red pepper in a shallow dish; stir with a whisk. Place egg whites in a medium bowl; beat with a mixer at medium high speed until frothy (about 2 min). Place coconut in a shallow dish.
4. Working with one shrimp at a time, dredge in cornstarch mixture. Dip in egg white, and dredge in coconut, pressing gently with fingers. Place shrimp on a baking sheet coated with cooking spray. Lightly coat shrimp with cooking spray. Bake for 20 min or until shrimp are done, turning after 10 min.
5. To prepare pineapple salsa, combine chopped pineapple and remaining ingredients in a medium bowl; stir to combine.

Monday, May 23, 2011

Coconut Chicken Fingers


A few months ago, Lisa hosted a challenge to cook through an article about preparing chicken different ways. Patrizia completed this recipe, and while I was intrigued, it took a really long time for it to make it into the meal plan.

I really had no idea what to serve on the side with this, so I made roasted broccoli, omitting the lemon and pepper. It turned out great, unlike my last attempt at roasting broccoli, which resulted in a disgusting burned disaster. I also made roasted potatoes from allrecipes. We were all super happy with how the sides turned out!

As far as the chicken fingers, I did a little thinking, inspired by the comments on the original recipe, and decided to bake instead of fry them. I already had the oven going for the sides, and figured doing so would allow me to clean up the kitchen a little bit or play with the family. I found this Rachael Ray recipe and used it as a starting point. My oven was already at 450, so instead of baking for 12 minutes, I set the timer for 10 minutes and kept an eye on them.

I really enjoyed my chicken fingers, and so did A. E wasn't interested and M said he thought they were ok but nothing special. They were a little on the bland side, I guess, but when dipped in a tiny bit of apricot preserves, they were outstanding.

I used one of my own packages of chicken breast. I typically package in 1lb increments. Tonight's package was only one (rather large) breast, so I'm not sure how much it actually was... For the amount I had, I used 1/2c of flour, and I used coconut as needed... I'll keep their measurements for you just in case.

I don't know if my sides really went together or compimented the meal, but each component was delicious on its own.

Coconut Chicken Fingers adapted from Cooking Light January 2011

1lb skinless, boneless chicken breast halves, cut into 1/2-inch-thick strips
1/2 teaspoon salt
1/4 teaspoon ground pepper
1 cup AP flour
1 cup whole buttermilk
1 large egg
1 1/2 cups unsweetened flaked coconut
3 tablespoons canola oil
Sweet chile sauce (optional)


1. Preheat oven to 450 degrees. Sprinkle chicken with salt and pepper. Place flour in a shallow dish. Combine buttermilk and egg in a shallow dish, stirring well. Place coconut in a shallow dish. Dredge chicken in flour; shake off excess. Dip chicken in egg mixture; dredge in coconut. Place on a baking sheet lined with silpat or parchment paper.
2. Bake chicken for 10 minutes, or until golden. Serve with chile sauce, if desired.
Posted by Picasa

Wednesday, February 23, 2011

Chicken with Grape Tomato Sauce

Photobucket

When Lisa made this a few weeks ago, I was intrigued because it looks so delicious and she raved about it so highly. I go nuts for anything with basil and tomato, so was happy to make it too.

I enjoyed this one a lot, and so did the boys.  M wasn't really over the moon for it; I think he wasn't fond of the cooked tomato flavor.  I, however, loved them--cooking the tomatoes brought out a sweetness that made them so awesome.  I used grape tomatoes because they were on sale and cherry tomatoes weren't even available.

So, give this a try when you're looking for a fast, easy, weeknight meal.


Originally from Cooking Light, January 2011

Ingredients

  • 4  (6-ounce) skinless, boneless chicken breast halves
  • 1/2  teaspoon  salt
  • 1/4  teaspoon  black pepper
  • 2  tablespoons  olive oil
  • 5  garlic cloves, coarsely chopped
  • 1  pint cherry tomatoes
  • 1/3  cup  fat-free, lower-sodium chicken broth
  • Garnish: 1/4 cup small basil leaves

Preparation

Place chicken breast halves between 2 sheets of plastic wrap; pound to 1/2-inch thickness. Sprinkle chicken with salt and pepper. Heat a large skillet over medium-high heat. Add olive oil to pan. Add chicken; sauté for 3 minutes on each side or until done. Transfer to a serving platter. Add coarsely chopped garlic cloves to pan; sauté for 1 minute, stirring constantly. Stir in cherry tomatoes and chicken broth, and bring to a boil. Cook 5 minutes, stirring occasionally. Spoon over chicken. Garnish with small basil leaves.

Wednesday, July 14, 2010

Pasta Puttanesca

Whore's pasta. What a name for a yummy dish. Of course, "whore's pasta, whore's pasta" was going through my head as my son was chowing down. And anything he enjoys definitely gets an extra star for me. We enjoyed it too, and it is reasonably healthful too!
Photobucket
This is a recipe my mother in law gave me a long time ago. Actually, it was in our first apartment together that this was made for the first time, and in fact, BAJ made the recipe that first time. I went for it this time, and was so pleased that it was a pantry meal. No groceries necessary was so important because it was pouring rain yesterday and I nixed the grocery trip.

This came out so great, and it was really easy to put together too! I'll post the recipe soon.

Sunday, March 21, 2010

Eggplant Parm

PhotobucketDid you know that eggplant is a fruit, not a vegetable?

I was completely planning to make my typical baked Eggplant Parm, and also planned to double and freeze it for lunch club. None of these plans happened.

Instead, I found this recipe on Start Cooking and decided to give it a whirl. I made a few minor modifications, and it turned out really well! At his first bite, M said, "This is REALLY good," and commented that this is a keeper and better than the baked. Even The Boy ate it, and asked for seconds...and finished those too!!

Here's the recipe, with my modifications:
  • 1 eggplant (8 ounces)
  • 1 teaspoon of salt
  • 2 cups of dry bread crumbs (Italian flavor) I used panko, as suggested
  • 1 1/2 cups of flour
  • 1 egg
  • 6 tablespoons of oil I used olive
  • 1 1/2 cups of spaghetti sauce
  • 8 ounces of mozzarella cheese - shredded
  • 1/4 cup of parmesan cheese - grated

Slice the eggplant into slightly larger than 1/4 inch thick slices. Sprinkle with salt and set in colander for 30-40 minutes. Press a paper towel into each slice to absorb all the liquid drawn from the eggplant.

Put the flour, egg, and crumbs into three separate flat, rimmed dishes. Add 1 teaspoon of water to the egg and with a fork, beat the egg.

Dredge each slice of eggplant into the flour, then dip into the egg, and finally press the bread crumbs into each slice of eggplant.

Preheat your frying pan on medium high heat. Add 3 Tablespoons of vegetable or olive oil to the pan and let it get hot. Add some garlic and let it "speak," as Rachael Ray says. Fry the eggplant until golden brown on each side – flip them only once.

Place the eggplant on a plate that has been lined with a paper towel.

Before frying the second batch, clean the pan out with a paper towel and a pair of tongs.

Add the remaining 3 Tablespoons of oil to the pan and fry the remaining eggplant.

Spread the sauce in a baking dish large enough to hold the eggplant in a single layer. (A little bit of overlapping is fine.)

Sprinkle on the mozzarella cheese and the parmesan cheese.

Bake the Eggplant Parmesan in a preheated 425º F ( = 220º C = gas mark 7- hot) oven for 15 minutes or until the cheese is melted and golden and the sauce is bubbly.


I felt that this was way too much mozzarella before baking, and not enough sauce, but it turned out to be just right on both accounts. Very yummy dish! This wasn't what I would call easy, simply because there were many steps and many dishes... there were no steps that were difficult or unlike anything I'd done before.

Saturday, February 13, 2010

Italian Mac n Cheese

I found this in my Google Reader on Living Insanity's Loving Food on Friday and marked it with the intent of making it that night for dinner. Plans changed and I pushed it instead to tonight.

When BAJ asked what dinner tonight was, I suspect he rolled his eyes to hear that I was making mac n cheese, which is certainly not typically a meal he enjoys. He came in as I was cooking and said, "there's mushrooms in this mac n cheese? and sausage?" Clearly, his interest was piqued, and he realized this was not the typical mac n cheese recipe.

I didn't know what bulk sausage was (until I was already cooking and looked it up). It apparently is those Jimmy Dean sausages that are in the frozen section, and not the typical Italian sausage that I used. It would be interesting to try it that way too.

I also bought 8 oz of Italian cheese. I just went and sprinkled shredded mozzarella on top.

Finally, I went to Acme for what I needed. Acme is not known for having fancy stuff. The only mushrooms in their case were white and portobello, so I went for the on sale sliced white mushrooms.

  • 1 pound ziti rigate, penne rigate or cavatappi (ribbed, hollow corkscrews)
  • 1 pound Italian bulk sweet sausage I used Italian sweet sausage
  • 2 tablespoons extra-virgin olive oil
  • 1 tablespoon butter
  • 3 or 4 cloves garlic, chopped
  • 12 crimini mushrooms, sliced pkg of sliced white mushrooms
  • Salt and pepper
  • 2 tablespoons all-purpose flour
  • 1 cup chicken stock
  • 1 cup heavy cream
  • 1 (10-ounce) sack, 2 1/2 cups, shredded Italian 4 cheese blend, available on dairy aisle
  • 1 can diced tomatoes, drained well
  • 1 teaspoon hot sauce (recommended: Tabasco), optional
  • 1/2 cup Parmesan, a couple of handfuls

Directions

Bring a large pot of water to a boil. Salt water and cook pasta to a chewy al dente, about 8 minutes.
In a nonstick skillet, brown and crumble the sausage. Drain cooked crumbles on paper towel lined plate. Return pan to heat and add extra-virgin olive oil, butter, garlic and mushrooms. Season liberally with salt and pepper. Saute 3 to 5 minutes, until mushrooms are lightly golden.
Preheat broiler to high.
To mushrooms, add flour and stir, cooking 2 minutes. Whisk in stock, then stir in cream. Bring cream to a bubble, then stir in 2 cups of 4 cheese blend. When cheese has melted into sauce, add tomatoes. When sauce comes to a bubble, remove from heat and adjust seasonings, adding hot sauce if desired.
Combine cheese sauce with sausage and pasta, transfer to baking dish, casserole or oven safe serving platter. Sprinkle remaining 1/2 cup of 4 cheese blend and the grated Parmesan over the top and brown under hot broiler.

My husband really liked this. He went back for seconds, which is unusual for him. Due to the broiling, it didn't have the "hard pasta" that he dislikes so much.
My 2 year old son really liked this. He asked for seconds as well, and ate the sausage, which is unusual for him.
I thought it was a little on the bland side. I wish I had added more Tabasco, or wonder if the Cremini mushrooms would have added more flavor, or using all Italian cheese blend. I would like to try the suggestions of the reviewers on food network's website and add another can of tomatoes or maybe some spinach for some more flavor and veggies!
Definite keeper in these parts!
Pictures coming soon!

Tuesday, December 8, 2009

Not so Sloppy Joes

I've made this several times before, and really have nothing new to report. The recipe is from Real Simple, and you can google it easily enough.

The reason I wanted to share this for the THIRD time, however, is that it was a meal my TODDLER, who generally refuses meat, ate it. And, he ate the meat part... ALONE...that is, without the roll.

As such, I didn't have enough to make tacos tonight as planned, but we saved the leftovers to feed...THE BOY!! Stellar!

I didn't so much like the look of the red peppers and chose green ones instead. I didn't think they would be as good as the red peppers in this recipe, but it worked just fine. I also used a leftover can of tomato paste; I think I used 2 or 3 T from it. I drained the fat from the turkey too. As a result, I didn't so much end up with a sauce; it was very thick and pastey, so I added a little bit of water. It really didn't affect the taste at all, but I might have liked it to be a little saucey.

I love this ole standby!
Related Posts with Thumbnails