Design tips welcome and appreciated. Organization and mess control tips would also be awesome!!
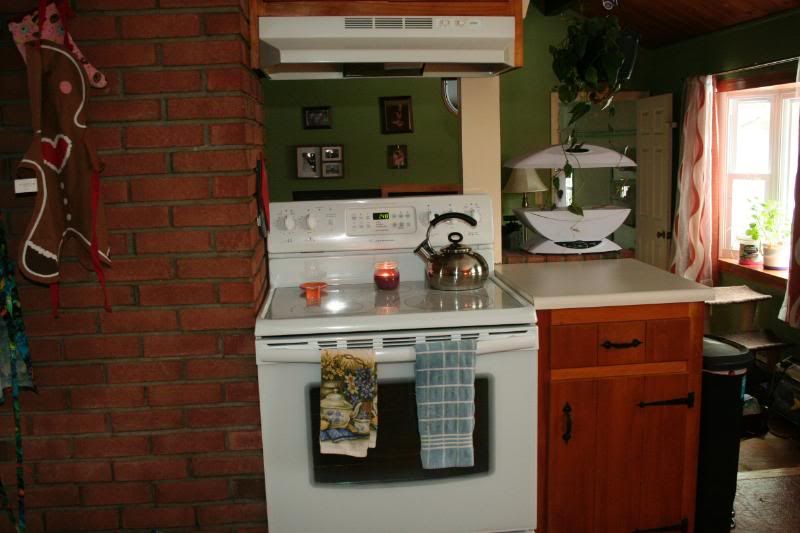
If I had a tripod and a pretty dress, I'd stand there with that icy expression. See the bread box? My grandmother has it too; hers holds bread, ours is overflowing with plastic grocery bags.
Is this a convenience Betty had? I'm not sure; it sort of looks like she has one next to the sink in the picture above. We couldn't live without ours.
Betty, and my grandmother too, have wooden shelves around their window. Obviously, we don't, but we do have that cool scalloped decoration at the top.
You can also see our 1964 kitchen door, which leads to the backyard.
I like standing at the stove and being able to see my family in the family room. I hate, however, having to stir or work on the stove, and being so confined by that (not to code) brick wall. It can't be moved, at least, not without moving the stove elsewhere, because that is the chimney.
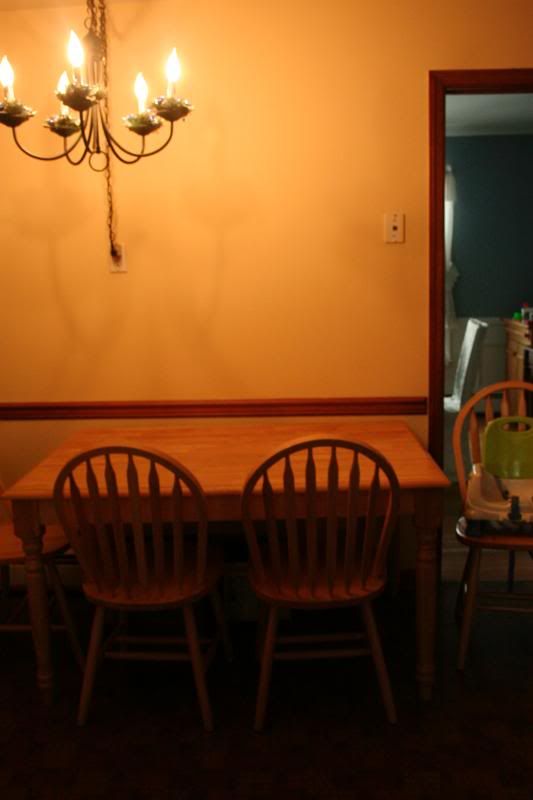
We have a very large kitchen; it's wonderful. I prefer eating at this table to our dining room (the blue room through that door) because the kitchen is generally warmer and cozier, especially in the winter time. I also have a very hard time keeping this table clean. When junk accumulates on the counter, it typically gets moved here.
Hubby has dreams of knocking down this wall, and making the kitchen and dining room one big room. I'm not really sure about the idea, because it would be a very long room, and this kind of change is one you can't really go back on if you don't like it.
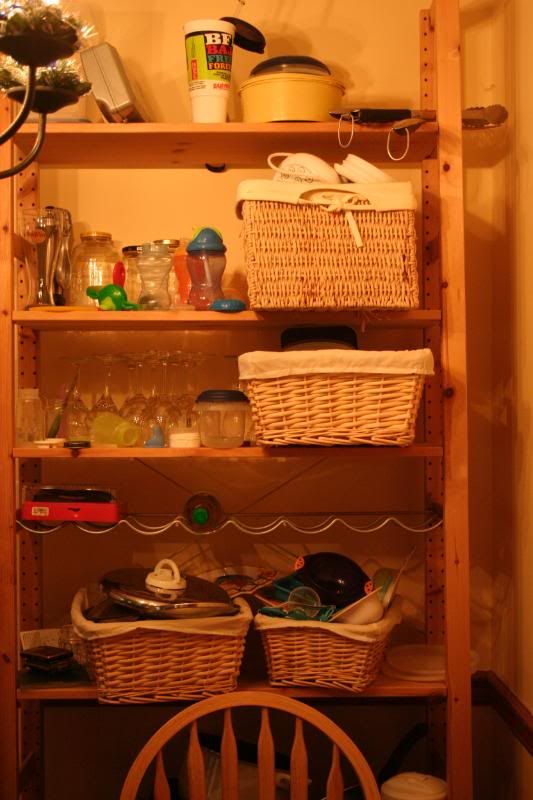
Speaking of junk, our dirty little secret. This is where all the stuff we use fairly regularly, but really don't have anywhere else to put. I'm embarrassed, but maybe someone has an idea or two that can help contain this mess.
In my dream of dreams, we have a modern looking kitchen. I'd love an island, perhaps with a sink and or/stove in it. I love the large kitchen, but feel like the stove/fridge/sink are so far from each other, it makes prep tough. We have a rolling island that I sometimes use as a prep area, though it's currently out of the way in the dining room, so the boys have room to play in the kitchen.
Monday, February 28, 2011
Friday, February 25, 2011
"Best Ever" Shrimp Salad
I've been participating in an online recipe swap; each participant submits a recipe and in exchange, gets another to make and share her thoughts on. I got this recipe, and with Lent coming soon, I was very happy to have a fish dish to add to the repertoire. I was particularly happy to exchange recipes for lunch; typically, lunch around here is a sandwich, almost always turkey or ham with American cheese or maybe I'll shake things up with some leftovers.
I had some problems with this one. See, I typically only use yellow mustard on my sandwiches. So, I don't keep up with the status of the Dijon mustard. As such, I didn't have enough for the recipe. I then turned to spicy brown, thinking this would be a good substitute. Alas, I also don't keep up on the status of our spicy brown. So, now I have about 4.5T of Dijon, about .5T of spicy brown, and then turned to the yellow. Perhaps as a result of all this, the recipe was much too mustardy.
I also used apple cider vinegar instead of white distilled plus sugar.
Other than the slight over mustard-i-zation, this was a pretty good (though very messy) lunch. From the moment I first saw the recipe, I thought it would be awesome with some chopped pineapple; I will definitely make that addition the next time I make this.
Ingredients
- Dressing:
- 3 tablespoons distilled white vinegar (I used apple cider vinegar)
- 3 tablespoons sugar (I omitted)
- 6 tablespoons Dijon mustard
- 6 tablespoons mayonnaise
- 3 kirby cucumbers, peeled and diced (I used half a regular cucumber)
- 1 large mango, peeled, pitted, and diced
- 1 pound cooked medium shrimp, cut into small bites
- 3 tablespoons chopped fresh dill
- Salt
Directions
- Mix vinegar and sugar until sugar dissolves.
- Add mustard and mayonnaise to the vinegar and whisk until smooth.
- Combine cucumbers, mango, shrimp, and dill in large bowl. Pour dressing over and toss to coat.
- Season with salt.
- Chill in fridge for about an hour before serving.
Thursday, February 24, 2011
Berry Meyer Lemon Pancakes
A few years ago, it seemed everyone was nuts for Meyer Lemons. At the time, I had no idea what they were, but after reading up on them, I was intrigued.
Fast forward to the other day, when we were in the "awesome" grocery store, and I happened to spot a bag of them. Of course, I no longer remember all the awesome things I then wanted to make. I turned to the internet and let my fingers do the walking. One recipe I found was this one from The Novice Chef. Sounded delicious, and since we were all home for breakfast today, I made them.
First, I didn't realize we didn't have any raspberries. Luckily, I found a bag of frozen strawberries leftover from berry picking in June. I sliced them up and tossed them right in still frozen (I read somewhere, I think in Cook's Illustrated, that doing so helps stop the berry's colors from running into the cake).
The flavors were really nice and light; somewhere in my research, a blogger said it was a nice combination of summer from the berries and winter from the Meyer lemons. It did take a longer time than I expected to get these cooked, probably because of the berries inside.
So, if you find yourself with a Meyer lemon and some berries, make yourself some pancakes!
Berry Meyer Lemon Pancakes
from The Novice Chef
You will need:
1 egg
1 cup flour
1 Tablespoon sugar
zest of 1 Meyer lemon
1 teaspoon baking powder
1/2 teaspoon baking soda
1/2 teaspoon salt
1 cup buttermilk
2 Tablespoons butter, melted and cooled slightly
1 cup fresh raspberries
oil or butter for cooking
In a small bowl rub the lemon zest into the granulated sugar until pale yellow and fragrant.
In a large bowl, whisk together the egg, buttermilk and butter. Add the flour, sugar, baking powder, baking soda and salt. Stir until just combined. The batter may be a bit lumpy. That’s better than over-mixing the batter. Fold in the berries with a few strokes. Not much stirring necessary.
Heat a griddle pan or a cast iron skillet over medium heat. Add a teaspoon of oil or a dab of butter and heat through. Add 2 heaping tablespoons of batter to the pan. Heat until bubbles form and start to pop. Carefully flip over and cook through. Place cooked pancakes on an oven proof plate and let rest in a 200 degree F oven while you fry the rest of the pancakes.
Top pancakes with maple syrup.
Adapted from: Joy The Baker
Wednesday, February 23, 2011
Stuffed Pizza
It's no secret that I love pizza, and that I've become fond of cooking it at home. Although it seems that this pizza is bad for you, and of course it is, with so much dough to it, it's at least a little bit better for you with the addition of so many veggies.
I've made this once before, following Lauren's suggestion to use tomatoes, and this time, I made it with roasted red peppers instead. I'm generally not a roasted red pepper fan, though they are slowly growing on me and I'm starting to enjoy them in certain combinations.
This came out very good; everyone enjoyed it, including my 10 month old son. I served it with marinara sauce on the side so it was actually very similar to a calzone.
This was a really tasty meal, somewhere in between healthful and not so healthful, but something we'll be making again!
Ricotta Stuffed Spinach and Broccoli Pizza Pie
Picky Palate, via Lauren's Kitchen
16 oz whole wheat or white pizza dough
1 Cup ricotta cheese
¼ Cup grated parmesan cheese
1 Tablespoon extra virgin olive oil
2 Cups fresh spinach leaves, chopped
2 Cups fresh broccoli florets, steamed until fork tender, about 3 minutes in boiling water
Pinch of salt
½ Cup Roasted red bell peppers, from can or fresh
1 ½ Cup shredded mozzarella cheese
2 Tablespoons extra virgin olive oil
½ teaspoon dried Italian Seasoning
1. Preheat oven to 375 degrees F. Divide dough into 2 equal pieces. Spread and press one piece of dough into the bottom and sides of a 9-9 ½ inch round cake or tart pan that has been sprayed with non-stick cooking spray. (I used a 9 ½ inch deep quiche pan with a removable bottom that worked perfectly) In a medium bowl, mix together the ricotta and parmesan cheese until well combined. Spread into pressed pizza dough.
2. Place olive oil into a medium skillet over medium heat. Saute spinach until wilted down, about 3 minutes. Place evenly over ricotta cheese layer. Place steamed broccoli florets over spinach and season with a pinch or two of kosher salt. Layer roasted red peppers, then mozzarella cheese over top. Press out remaining piece of dough and place over filling, tucking edges inside of pan. Brush with olive oil and sprinkle with Italian Seasoning. Bake for 25-35 minutes or until crust is golden brown and cooked through.
3. Let cool for 10 minutes before removing from pan or cutting into wedges.
8 slices
Chicken with Grape Tomato Sauce
When Lisa made this a few weeks ago, I was intrigued because it looks so delicious and she raved about it so highly. I go nuts for anything with basil and tomato, so was happy to make it too.
I enjoyed this one a lot, and so did the boys. M wasn't really over the moon for it; I think he wasn't fond of the cooked tomato flavor. I, however, loved them--cooking the tomatoes brought out a sweetness that made them so awesome. I used grape tomatoes because they were on sale and cherry tomatoes weren't even available.
So, give this a try when you're looking for a fast, easy, weeknight meal.
Originally from Cooking Light, January 2011
Ingredients
- 4 (6-ounce) skinless, boneless chicken breast halves
- 1/2 teaspoon salt
- 1/4 teaspoon black pepper
- 2 tablespoons olive oil
- 5 garlic cloves, coarsely chopped
- 1 pint cherry tomatoes
- 1/3 cup fat-free, lower-sodium chicken broth
- Garnish: 1/4 cup small basil leaves
Preparation
Place chicken breast halves between 2 sheets of plastic wrap; pound to 1/2-inch thickness. Sprinkle chicken with salt and pepper. Heat a large skillet over medium-high heat. Add olive oil to pan. Add chicken; sauté for 3 minutes on each side or until done. Transfer to a serving platter. Add coarsely chopped garlic cloves to pan; sauté for 1 minute, stirring constantly. Stir in cherry tomatoes and chicken broth, and bring to a boil. Cook 5 minutes, stirring occasionally. Spoon over chicken. Garnish with small basil leaves.Pizza Bagels
Before my husband and I started living together, I'd never had an English muffin pizza. He, however had them often as a kid, and so this was something we had for dinners pretty frequently in those early days. In a lot of ways, this reminded me of those.
A few weeks ago, Kelly at Running Mama Cooks posted a Weight Watchers style of chicken pizza using Pepperidge Farms' Bagel Flats. Inspired, I went to the store to buy them; one store had only everything Bagel Flats and Cinnamon Raisin Bagel Flats. I didn't think either of those would work. I remembered I wanted to try them when I went to a different store; they only had plain. I guess these things are really popular! So, I picked up the plain.
As I said, I was inspired by Kelly, but I also went for something easy for lunch. Plain bagel, homemade marinara sauce, topped by shredded mozzarella. It was so good, but I also thought it would be delicious with a burger inside.
Today, I stepped it up a tiny bit and topped it with diced red pepper. Again, really tasty, but also sort of...plain bagel. I really want to try this again using those everything bagel flats!
My husband has eaten about half the package of Bagel Flats just as regular bagels. He commented that he's been having them 2 at a time, but this is a huge step for him, since he typically eats two bagel shop bagels.
Sunday, February 20, 2011
Slow Cooked Asian Style Chicken
When I think of sweet and sour sauce, I think of that super sweet, gooey orange stuff you get at the Chinese restaurant. When I saw that this recipe called for sweet and sour sauce, I went to the store and saw it was loaded with high fructose corn syrup, so passed on it, figuring I could certainly find a recipe on the internet for sweet and sour sauce for cheaper. I found this highly rated recipe for sweet and sour sauce on allrecipes and used it in the place of the sweet and sour sauce; I'm not sure if it made the called for 10oz or not, and it definitely wasn't that tell tale orange. It was, however, delicious.
I found this on Lauren's blog, and took her suggestion to use chicken thighs (the original calls for beef, which is a no no in the Mad Men Kitchen more often than not). In the future, I might mix in some chicken breast for the white meat preferring palates in the house, and maybe 1/2-1 can of water chestnuts.
I really enjoyed this meal, and the sauce was great as well--and fairly easy to make too.
Sweet and Sour Sauce
from allrecipes
Ingredients
- 3/4 cup white sugar
- 1/3 cup white vinegar
- 2/3 cup water
- 1/4 cup soy sauce
- 1 tablespoon ketchup
- 2 tablespoons cornstarch
Directions
- Place the sugar, vinegar, water, soy sauce, ketchup and cornstarch in a medium saucepan, and bring to a boil. Stir continuously until the mixture has thickened.
Slow Cooked Asian Style Chicken
Cover and cook on low heat for 7 to 8 hours or high heat for 3 1/2 to 4 hours. At the end of 7 to 8 hours, turn to high heat setting and stir in frozen vegetables. Cover and cook for additional 30 to 60 minutes or until vegetables are tender. Serve over hot cooked rice.
- 2-3 pounds boneless, skinless chicken thighs
- 2 tablespoons quick-cooking tapioca
- 1 (10-ounce) jar sweet and sour sauce
- 1 (16-ounce) package frozen broccoli stir-fry vegetables (broccoli, carrots, onions, red peppers, celery, water chestnuts, and mushrooms)
- 3 cups hot cooked rice or rice noodles
Place chicken into 3 1/2-4 quart slow cooker. Sprinkle with tapioca; pour sweet and sour sauce over chicken in cooker.
Cover and cook on low heat for 7 to 8 hours or high heat for 3 1/2 to 4 hours. At the end of 7 to 8 hours, turn to high heat setting and stir in frozen vegetables. Cover and cook for additional 30 to 60 minutes or until vegetables are tender. Serve over hot cooked rice.
Thursday, February 17, 2011
Creamy Artichoke, Lemon, and Chicken Pasta
When this showed up in my Google Reader, I thought I wanted to add it to the meal plan as soon as possible, and why not? Confections of a Foodie Bride's photography of it looks awesome, it seemed quick and easy, and had a combination of flavors we love in this house.
I got around to making it last night, a night that M was away all night. I don't like to cook when M isn't home; it's always been that way, even when it was just the two of us. But, with my not working, and any meal out now means feeding all of us, takeout is becoming less of an option. Plus, I don't really feel comfortable giving the baby much from a takeout menu, except in really serious circumstances. Last night, cooking worked exceptionally well--A played with his Leapster in the family room while E crawled around the floor, played with his fridge magnets, and ultimately, went into his high chair and snacked.
I was so proud of myself for getting dinner on the table! Then, we tasted it. I have a problem of my brain getting in the way of my palate. I knew in my head the chicken was on the verge, but it smelled ok, so I used it. I took a bite, and just didn't like it. I also felt that the sauce was exceptionally thin; I tried to simmer it down, but it just wasn't enough. Finally, due to my using what I had--turkey bacon in this case--there just wasn't enough bacon fat for the chicken. I added olive oil when the chicken was cooking.
So, this goes into the files of "Try again." I'm sure this is a good one, and I do want to try it again, but this time around, I messed up what seems to be a very good recipe!
Creamy Artichoke Lemon & Chicken Pasta
From Confections of Food Bride
12 oz spaghetti
3 slices bacon
2 skinless, boneless chicken breasts, halved and pounded to 1/4-inch thickness
1/4 cup all-purpose flour
Salt
Pepper
1 can artichoke hearts, drained and quartered
2 tsp capers, drained
1/2 cup white wine
1 cup chicken broth
1/3 cup fresh lemon juice
1/3 cup heavy cream
1 Tbsp butter, chilled
Fresh parsley, chopped, for garnish
Bring a large pot of lightly salted water to boil. Add pasta, and cook until al dente, about 8 to 10 minutes. Drain, and set aside.
In a large Dutch oven, cook the bacon over medium heat, cook through. Remove bacon with a slotted spoon and reserve. In a bowl, stir together flour, salt, and pepper. Lightly coat chicken with flour mixture. Without crowding, carefully place chicken in the bacon grease. Fry until cooked through and golden brown on both sides. Remove the chicken to paper towels. Stir the mushrooms, artichokes, and capers into the pan. Deglaze the pan with the wine. Cook for 2 minutes. Add the broth and lemon juice, cook for 2 minutes more. Stir in the cream and the butter to the sauce, stirring until completely incorporated. Season with salt and pepper.
Cut the chicken breasts into strips, and return them to the pan. Stir the pasta and bacon into the chicken mixture. Serve.
Serves 4
Slightly adapted from So Tasty So Yummy
Tuesday, February 15, 2011
One of the easiest...
Our baby has taken on a new schedule, one that has him napping from 3-4:30, rather than the very nice 1-3. This new schedule makes the afternoon frantic for me, since I now have to leave for daycare pickup around 4:45, fighting all the people trying to get home from work, walking in the door at 5:30. I know for many of you, dinner doesn't even get started until well after 6, but in a two teacher household, dinner is typically finished by 6, so this late start stresses me out.
I was in no mood to take on a complicated recipe, so instead turned to this easy meal that my husband brought to our relationship. He much prefers it with "tomato alfredo" sauce, which was not to be found anywhere in the grocery store when we first started dating, but now can be found on the top shelf at the grocery store (read: more expensive bottles), so I buy a few bottles as a special treat for him when it goes on sale. This can also be done with shrimp, and he prefers to have garlic bread with it.
1lb chicken (or shrimp)
bottle of your favorite sauce (or equivalent homemade)
1/2lb pasta
1. Start your pasta going. Cook according to package directions.
2. Cut your chicken into bite sized pieces. If using shrimp, remove all the ickies.
3. Pour the jar of sauce into a large skillet. Add the chicken to the sauce.
4. Simmer until chicken is cooked through, about 10 minutes.
5. Serve sauce and chicken over cooked pasta.
Monday, February 14, 2011
(Successful) Marshmallows!
Fourth time, my friends, is the charm. I've now made Dorie Greenspan's marshmallow recipe three times, and the best I got was "this is tolerable."
Then, Jen posted on facebook that she was making these awesome "hot chocolate on a stick" favors, and she shared the recipe she used for the marshmallows. She mentioned that these were delicious and more important, easy.
She was right; these were way easier than Dorie's and they are tasty too! I can't wait to try these on s'mores, in fluffy hot chocolate, etc etc. The recipe isn't overwhelming or really all that difficult; it's explicit enough to be almost simple.
So, give this marshmallow recipe a try; see what a difference homemade makes when it comes to marshmallows.
Fluffy Vanilla Marshmallows
Taken from Apartment Therapy The Kitchn via Jar of Ideas
Gratefully adapted from Marshmallows by Eileen Talanian
Makes roughly 100 marshmallows, depending on size
Tools:
9x13 baking pan or other flat container
4-quart sauce pan (slightly larger or smaller is ok)
candy thermometer - one that can clip to the side of the sauce pan
standing mixer with a wire whisk attachment - hand mixers just aren’t strong enough, unfortunately
stiff spatula or spoon (as opposed to a rubbery, flexible one)
Optional: Pastry brush
Ingredients:
3 tablespoons (usually 3 packets) unflavored gelatin powder
1/2 cup + 2 tablespoons cold water
1 1/2 tablespoons vanilla extract
3/4 cup water
1 1/4 cup sugar cane syrup or corn syrup
pinch salt
1 1/2 cups granulated sugar
Spray your baking pan with cooking spray. Use a paper towel to wipe the pan and make sure there’s a thin film on every surface, corner, and side. Make sure the rest of your equipment ready to go.
To bloom the gelatin, measure the gelatin powder into your mixer bowl. Combine the water and vanilla in a measuring cup and pour this over the gelatin while whisking gently with a fork. Continuing stirring until the gelatin reaches the consistency of apple sauce and there are no more large lumps. Set the bowl back in your standing mixer.
Combine the water, corn syrup, salt, and sugar in a 4-quart sauce pan. Place this over medium-high heat and bring it to a boil. As it’s coming to a bowl, occasionally dip your pastry brush in water and brush down the sides of the pot. This prevents sugar crystals from falling into the liquid, which can cause the syrup to crystallize. If you don’t have a pastry brush, cover the pan for 2 minutes once the mixture is at a boil so the steam can wash the sides.
Do not stir the sugar once it has come to a boil or it may crystallize.
Clip a candy thermometer to the side of the sauce pan and continue boiling until the sugar mixture reaches 250°F. Take the pan off the heat and remove the thermometer.
With the mixer on medium speed, gently and carefully pour the hot sugar syrup down the side of the bowl into the gelatin. The mixture may foam up - just go slowly and carefully. When all the syrup has been added, cover the bowl with a cloth and increase the speed to high (the cloth protects from splatters). Whip for 10-12 minutes, until it looks like glossy meringue.
When you’re finished mixing, lower the speed to medium and lift the whisk partway out of the bowl so it spins off as much marshmallow mix as possible. Using your stiff spatula, scrape the marshmallow mixture into the pan. This stuff is very thick and sticky, so don’t worry about getting every last bit out of the bowl. Just get as much as you can.
Wet your fingers and smooth the top so it’s even. Let the mixture sit out uncovered for 12-15 hours to set and cure.
Marshmallow Coating
1 1/2 cups powdered sugar
1/2 cup cornstarch
Combine the powdered sugar and cornstarch in a bowl.
Sprinkle the top of the cured marshmallows with powdered sugar mix and turn them out onto your work surface. Use a spatula to pry them out of the pan if necessary. Sprinkle more powdered sugar mixture over the top.
Using a sharp knife or pizza wheel, cut the marshmallows into squares. It helps to dip your knife in water every few cuts. Toss each square in the powdered sugar mix so all the sides are evenly coated.
Marshmallows will keep in an airtight container at room temperature for several weeks. Leftover marshmallow coating can be stored in a sealed container indefinitely.
Ben and Jerry's Banana Ice Cream
Bananas don't last long around here. They never have, but now that we have two little boys who would eat a banana daily if they could, it's gotten a bit ridiculous. Most recently, we purchased 3 bunches of bananas, which amounted to about 8lbs, with the intention of letting some of them turn brown for ice cream.
I had to put them in the fridge for that to happen. Yes, I hide food from my child.
I made this tonight, and M's first response was "This is good; it tastes like liquid banana." It was quite yummy, but I've found I like the ice cream even better after it sits in the freezer overnight. After freezing, the taste was even better; M didn't like that there were some chunks of frozen banana inside, but I prefer surprise chunks in my ice cream. It was very tasty, and I will certainly be making this one again.
This made a LOT more than the previous ice creams I've made, covering the dasher completely. It filled about 1.5 of my 6c containers.
I used B&J's Sweet Cream Base #1 this time around. Recipe from Ben & Jerry's Homemade Ice Cream & Dessert Book by Ben Cohen and Jerry Greenfield
Sweet Cream Base 1
2 large eggs
3.4c sugar
2c heavy cream
1c milk
Whisk the eggs in mixing bowl until light and fluffy. Whisk in the sugar, a little at a time, then continue to whisk until completely blended. Pour in the milk and cream and whisk to blend.
Banana Ice Cream
Sweet Cream Base
Juice of 1 lemon
2 overripe bananas
1. Prepare the base. Transfer to ice cream maker and freeze according to manufacturer's directions.
2. Meanwhile, mash the banana and lemon juice together in a medium bowl, then whisk until smooth.
3. After the ice cream stiffens, add the banana mixture, then continue mixing and freeze until ready.
Saturday, February 12, 2011
Red Velvet Cupcakes
I've never had red velvet before, at least not that I can recall. It's become all the rage, or maybe it's just that it's all the rage and I'm just now paying attention. On the most recent Cupcake Wars, one of the judges said something along the lines of, "I cannot stand another red velvet." The next contestant, who'd made a red velvet, changed it up by using red wine instead of vinegar.
I made these for my son's preschool class. I found these little heart shaped cupcake tins, and they are so cute. That said, they are large. The recipe I used makes 24, but it made about 17 in these tins.
I didn't really know how to pipe the frosting in a heart shape; they looked terrible when I piped in a heart shape. They looked a lot better when I started to follow a circular pattern.
As far as the taste, they were pretty delicious. Since I plan to send them into school, we had to take one of the duds, and they'll have to cut them in half as it is. Even though it was a dud, and very underfilled so it was a little crisp, it was very tasty. Delicious even, and I'm thinking about eating more and sending less into school.
The teachers don't need to eat cupcakes for Valentine's Day, right?????
Red Velvet Cupcakes with Cream Cheese Frosting
Recipe from Brown Eyed Baker
Yield: 12 cupcakes
Prep Time: 15 minutes | Bake Time: 20 minutes
For the Cupcakes:
4 tablespoons unsalted butter, at room temperature
¾ cup granulated sugar
1 egg
2½ tablespoons unsweetened cocoa powder
3 tablespoons red food coloring
½ teaspoon vanilla extract
½ cup buttermilk
1 cup + 2 tablespoons all-purpose flour
½ teaspoon salt
½ teaspoon baking soda
1½ teaspoons distilled white vinegar
For the Cream Cheese Frosting:
4 ounces butter, at room temperature
4 ounces cream cheese, at room temperature
2½ cups powdered sugar
1 tablespoon vanilla extract
1. Preheat oven to 350 degrees F. Line a standard muffin/cupcake pan with liners.
2. On medium-high speed, cream the butter and sugar until light and fluffy, about 3 minutes. Turn the mixer to high and add the egg. Scrape down the bowl and beat until well incorporated.
3. In a separate small bowl, mix together the cocoa powder, vanilla extract and red food coloring to make a thick paste. Add to the batter and mix on medium speed until completely combined. You may need to stop the mixer to scrape the bottom of the bowl, making sure that all the batter gets color.
4. Reduce the mixer speed to low and slowly add half of the buttermilk. Add half of the flour and mix until combined. Scrape the bowl and repeat the process with the remaining milk and flour. Beat on high until smooth.
5. Again, reduce the mixer speed to low and add the salt, baking soda and vinegar. Turn to high and beat for another couple of minutes until completely combined and smooth.
6. Divide the batter evenly between the cupcake liners and bake for about 20 minutes, or until a thin knife or skewer inserted into the center of the largest cupcake comes out clean.
7. Cool for 10 minutes and then remove cupcakes from the pan and place them on a cooling rack to cool completely before frosting.
8. To make the frosting: Using the whisk attachment, whip the butter and cream cheese on high speed for about 5 minutes, scraping the bowl down as necessary. Reduce the speed to low and slowly add the powdered sugar until all is incorporated. Add the vanilla and mix to combine. Increase the speed to medium high and whip for a few minutes until the frosting is light and fluffy, scraping the bowl as necessary.
*Note: This recipe can be doubled to make an 8 or 9-inch layer cake.
(Recipe adapted from Joy the Baker, originally from The Hummingbird Bakery Cookbook)
Pork Tenderloin wtih Roasted Potatoes and Shallots
My mom always said, "If you can read a recipe, you can cook." I never really believed her then, and the more I cook, the more I realize that's not at all the case. Sure, you need to be able to read the recipe, but there's a lot more you need to know, certain techniques and skills.
You need to know the specifics of your equipment. So, if a recipe says to heat oil on medium-high, you need to be prepared for blackened shallots when you do so.
You need to know how to use a meat thermometer, so when you use it and the meat gets to the specified temperature, you will know why the meat comes out raw:
You need to know that cooked pork is white with a little bit of pink so it's not so overdone to be dry.
Among many other things like the difference between saute and chop, the difference between a skillet and a saucepan, etc etc etc.
This is another one from Cook's Country magazine. It is billed as a 30 minute meal, but it took me more like 45.
Despite the blackened bits of shallot, the potatoes were absolutely delicious. The pork, however, probably would have been good, had it been somewhere between raw inside and overcooked. I really have no idea what happened to the pork and why it registered on the thermometer at the correct temperature, but looked this way when I cut in.
I might make this again some day, but not on a day I've been baking all morning because this made a lot of dishes (at least the way I did things), and a really big mess on the stove.
I really think I need to go on Worst Cooks in America.
Pork Tenderloin wtih Roasted Potatoes and Shallots
Cook's Country Magazine, October/November 2010
Serves 4
2 medium Yukon gold potatoes, scrubbed and sliced 1/2" thick
8 shallots, peeled and halved lengthwise
S&P
2 pork tenderloins (the small kind)
1t dried thyme
1/2c balsamic vinegar
3T brown sugar
1T coarse grain mustard
1. Toss potatoes, shallots, 1T oil, 1/2t salt, and 1/4t pepper in large bowl. Cover and microwave, about 5 minutes, shaking bowl halfway through. Drain well.
2. Meanwhile, pat pork dry and season with salt and pepper. Heat 1T oil in large nonstick skillet over medium-high heat until just smoking. Cook pork until browned all over, 5-7 minutes. Transfer to plate.
3. Add potato mixture, remaining oil, and thyme to skillet. Cook until potatoes are browned, about 5 minutes. Transfer to platter and cover with foil. Bring vinegar and brown sugar to a boil over medium heat. Return tenderloins and any juices to skillet, cover and cook, until meat registers 145 degrees, about 10 minutes. Transfer to carving board and tent with foil. Simmer sauce until thickened, about 3 minutes. Off heat, whisk in mustard. Slice pork and transfer to platter with potatoes. Pour sauce over and serve.
Friday, February 11, 2011
Pink Marshmallows, Take 2
I tried again on the pink marshmallows. I really want to send these babies into school with A on Valentine's Day. It looks like that won't be happening. Although Dorie's instructions say to wait three hours, I had a really hard time getting them off the parchment and they just looked icky. Plus, they are really..cornstarchy. I've read other marshamallow recipes that say they need to sit for 12 hours, so I'm going to let them sit overnight and see what happens.
Skillet Meatballs and Noodles in Creamy Herb Sauce
Do you have a go to source when making your meal plan? For me, it's usually the folks at America's Test Kitchen. I purchased the America's Test Kitchen Family Cookbook a few years ago on a whim when Borders was closing and things were priced well, and it quickly became a bible for me. It gave me confidence in the kitchen, such that I started baking and then even participated in the Tuesdays with Dorie baking challenge.
For my birthday, my husband gave me a subscription to Cook's Country magazine. I've had some big hits with this subscription. When I saw this recipe in the October/November issue (yeah, it sometimes takes me awhile to look at everything), I put it right on the meal plan.
The first thing my husband said was, "They lied!" because it took me close to an hour to put it together. I actually laid out all my ingredients, measured them, and re-read the recipe (like you're supposed to) before I started cooking, which took I guess 10 minutes.
The verdict on this one was that we really liked the noodles and the sauce, but weren't really over the moon about the meatballs. I thought they were kind of dry and had a strange flavor. When I was browsing through some blogs today, I noticed that Taste of Home Cooking had a similar problem when she made the recipe. Very weird; ATK recipes very rarely fail!
Recipe (thanks to Taste of Home cooking for the C&P!)
Skillet Meatballs and Noodles in Creamy Herb Sauce
Cook's Country magazine, October/November 2010
1 pound ground beef (85% or so)
1 package garlic and herb Boursin cheese
Salt and pepper
Vegetable oil
1 onion, chopped fine
2 tablespoons all purpose flour
3 1/2 cups low sodium chicken broth
8 ounces egg noodles
1/4 cup white wine
1/4 cup finely chopped fresh chives
Combine beef, 5 tablespoons Boursin cheese, 3/4 teaspoon salt, and 1/4 teaspoon pepper in a medium bowl and knead gently until combined. Form mixture into 1 inch meatballs. Heat oil in large nonstick skillet over medium-high heat until just smoking. Cook meatballs until well browned all over, about 5 minutes. Transfer meatballs to plate and pour off all but 1 tablespoon fat from pan.
Cook onion in reserved fat until browned, about 6-8 minutes. Stir in flour and cook until golden, about 1 minute. Add broth, noodles, and wine and bring to a boil. Cover, reduce heat to med-low, and cook, stirring often, until pasta begins to soften, about 5 minutes. Add meatballs and simmer, covered, until meatballs are cooked through and noodles are al dente, about 4 minutes. Turn off the heat and stir in remaining Boursin cheese and chives. Season with salt and pepper.
Thursday, February 10, 2011
Marshmallow
I wish I had a gorgeous picture of a fluffy pink marshmallow to share with you.
I don't.
I do have a pretty picture of pink marshmallow
and I also have a picture of pink marshmallow slop
but no pretty pink fluffiness.
I've made these marshmallows by Dorie Greenspan before; on my first maternity leave, I participated in Tuesdays with Dorie, and it was one of the challenges. They didn't turn out right on that try, but they turned out.
Today, we made the mallows and when we went to cut them (using an adorable heart cookie cutter), M said "they're really sticky." I lifted up the cutout and it was gooey and liquidy underneath. And kinda gross.
They did, however, come out the perfect shade of pink. I used leftover icing food coloring (Spiderman) and it was a beautiful Valentine's Day shade of pink. In fact, it perfectly matched the Converse One Stars A picked out for his decidedly un-pink Mommy the other day. I also added a splash of raspberry extract, and the flavor seemed spot on in the one bite I dared to taste.
So, my attempt at a cute Valentine's Day treat for A's class failed. Trying a different recipe this weeked; hopefully with better results!
The recipe: (Taken from A Year From Oak Cottage)
SERVING: Put the marshmallows out and let everyone nibble as they wish. Sometimes I fill a tall glass vase with the marshmallows and put it in the center of the table -- it never fails to make friends smile. You can also top hot chocolate or cold sundaes with the marshmallows.
I don't.
I do have a pretty picture of pink marshmallow
and I also have a picture of pink marshmallow slop
but no pretty pink fluffiness.
I've made these marshmallows by Dorie Greenspan before; on my first maternity leave, I participated in Tuesdays with Dorie, and it was one of the challenges. They didn't turn out right on that try, but they turned out.
Today, we made the mallows and when we went to cut them (using an adorable heart cookie cutter), M said "they're really sticky." I lifted up the cutout and it was gooey and liquidy underneath. And kinda gross.
They did, however, come out the perfect shade of pink. I used leftover icing food coloring (Spiderman) and it was a beautiful Valentine's Day shade of pink. In fact, it perfectly matched the Converse One Stars A picked out for his decidedly un-pink Mommy the other day. I also added a splash of raspberry extract, and the flavor seemed spot on in the one bite I dared to taste.
So, my attempt at a cute Valentine's Day treat for A's class failed. Trying a different recipe this weeked; hopefully with better results!
The recipe: (Taken from A Year From Oak Cottage)
*Marshmallows*
Including marshmallows as a spoon dessert may seem like cheating -- after all, they're eaten with fingers (or, by campers, from sticks picked up in the forest) -- but making them at home is too much fun to miss. And in fact this dessert is related to others in this chapter: the base is meringue -- sweetened and strengthened by a cooked sugar syrup and fortified by gelatin.There's nothing difficult about making the marshmallows, but the meringue does need a long beating. While you can use a hand mixer, a stand mixer makes the job easier.I'm giving you the recipe for a basic vanilla marshmallow. See Playing Around (below) for raspberry, chocolate, cappuccino and pumpkin marshmallows.Makes about 1 pound marshmallows
About 1 cup potato starch (found in the kosher foods section of supermarkets) or cornstarch
2 tablespoons light corn syrup
2 1/4-ounce packets unflavored gelatin
3 large egg whites, at room temperature
3/4 cup cold water
1 tablespoon pure vanilla extract
1 1/4 cups plus 1 tablespoon sugar
GETTING READY: Line a rimmed baking sheet -- choose one with a rim that is 1 inch high -- with parchment paper and dust the paper generously with potato starch or cornstarch. Have a candy thermometer at hand.
Put 1/3 cup of the water, 1 1/4 cups of the sugar and the corn syrup in a medium saucepan over medium heat. Bring the mixture to a boil, stirring until the sugar dissolves. Once the sugar is dissolved, continue to cook the syrup -- without stirring -- until it reaches 265 degrees F on the candy thermometer, about 10 minutes.
While the syrup is cooking, work on the gelatin and egg whites. In a microwave-safe bowl, sprinkle the gelatin over the remaining cold water (a scant 7 tablespoons) and let it sit for about 5 minutes, until it is spongy, then heat the gelatin in a microwave oven for 20 to 30 seconds to liquefy it. (Alternatively, you can dissolve the gelatin in a saucepan over low heat.)
Working in the clean, dry bowl of a stand mixer fitted with the whisk attachment or in another large bowl with a hand mixer, beat the egg whites on medium-high speed until firm but still glossy -- don't overbeat them and have them go dull.
As soon as the syrup reaches 265 degrees F, remove the pan from the heat and, with the mixer on medium speed, add the syrup, pouring it between the spinning beater(s) and the sides of the bowl. Add the gelatin and continue to beat for another 3 minutes, so that the syrup and the gelatin are fully incorporated. Beat in the vanilla.
Using a large rubber spatula, scrape the meringue mixture onto the baking sheet, laying it down close to a short end of the sheet. Then spread it into the corners and continue to spread it out, taking care to keep the height of the batter at 1 inch; you won't fill the pan. Lift the excess parchment paper up to meet the edge of the batter, then rest something against the paper so that it stays in place (I use custard cups).
Dust the top of the marshmallows with potato starch or cornstarch and let the marshmallows set in a cool, dry place. They'll need about 3 hours, but they can rest for 12 hours or more.
Once they are cool and set, cut the marshmallows with a pair of scissors or a long thin knife. Whatever you use, you'll have to rinse and dry it frequently. Have a big bowl with the remaining potato starch or cornstarch at hand and cut the marshmallows as you'd like -- into squares, rectangles or even strips (as they're cut in France). As each piece is cut, drop it into the bowl.
When you've got 4 or 5 marshmallows in the bowl, reach in with your fingers and turn the marshmallows to coat them with starch, then, one by one, toss the marshmallows from one hand to the other to shake off the excess starch; transfer them to a serving bowl. Cut and coat the rest of the batch.
SERVING: Put the marshmallows out and let everyone nibble as they wish. Sometimes I fill a tall glass vase with the marshmallows and put it in the center of the table -- it never fails to make friends smile. You can also top hot chocolate or cold sundaes with the marshmallows.
STORING: Keep the marshmallows in a cool, dry place; don't cover them closely. Stored in this way, they will keep for about 1 week -- they might develop a little crust on the outside or they might get a little firmer on the inside, but they'll still be very good.
*Playing Around*
RASPBERRY MARSHMALLOWS: Fruit purees are excellent for flavoring these candies.For raspberry marshmallows, you'll need a generous 1/3 cup of puree; reduce the vanilla extract to 1/4 teaspoon. After the batter is mixed, gently fold in the puree with a rubber spatula. You can use the same measurements and technique for other purees, such as strawberry, mango and passion fruit.
CAPPUCCINO MARSHMALLOWS: Sift 1/4 cup unsweetened cocoa powder, 2 tablespoons instant espresso powder and 1/2 teaspoon ground cinnamon together into a small bowl. Stir in 1/3 cup boiling water and mix until smooth. Reduce the vanilla extract to 1/2 teaspoon, and add it to the espresso mix. After you add the sugar syrup and gelatin to the meringue, beat in the espresso mixture and continue.
LIGHT CHOCOLATE MARSHMALLOWS: Melt 3 ounces bittersweet or semisweet chocolate and stir in 2 1/2 tablespoons unsweetened cocoa powder. Reduce the vanilla extract to 1/4 teaspoon, and after the marshmallow batter is mixed, fold in the chocolate mixture with a large rubber spatula.
PUMPKIN SPICE MARSHMALLOWS: Whisk together 1/2 cup canned unsweetened pumpkin puree, 1 teaspoon ground cinnamon, 1/2 teaspoon ground ginger, a pinch of freshly grated nutmeg and a pinch of ground allspice. After the marshmallow batter is mixed, fold in the spiced pumpkin with a large rubber spatula.
Ben and Jerry's Light Chocolate with Marshmallow Swirl
I have been on a quest for cute ice cream bowls, with all the ice cream I've been making around here. You'd think that, with Valentine's Day right around the corner, this would be an easy task. It hasn't been! I found cute heart bowls at Michael's, but they seemed huge... as if I don't already overdo it on ice cream.
So I have these little containers around. They're the Target brand of baby food, but since they have a lid, I saved them for Cheerios and stuff. It also happens to be the perfect size for a small serving of ice cream. I'm so klassy with a k.
I have three ice cream recipe books out from the library right now, and so I combined a few recipes to come up with Chocolate Marshmallow Swirl. The base is by Ben and Jerry's, and I swirled in the marshmallow fluff right before freezing. The instructions on the other recipe said to not overswirl the fluff or it would melt, so I did a good job of underswirling.
This was pretty tasty, but I have to say I'm not in love with it. I'll keep looking for an awesome chocolate ice cream recipe, which makes me sad--it's Ben and Jerry's, how can I possibly not be in love with it?
Light Chocolate Ice Cream with Marshmallow Swirl
very slightly adapted from Ben & Jerry's Homemade Ice Cream & Dessert Book by Ben Cohen and Jerry Greenfield
1 oz unsweetened chocolate
1/4c unsweetened cocoa powder
1-1/2c milk
2 large eggs
3/4c sugar
1c heavy or whipping cream
1t vanilla extract
1/2c marshmallow fluff
1. Melt the unsweetened chocolate in the top of a double boiler on hot, not boiling, water. Gradually whisk in the cocoa and heat, stirring constantly, until smooth. (The chocolate may clump together. Don't worry, the milk will dissolve it.) Whisk in the milk, a little at a time, and heat until completely blended. Remove from the heat and let cool.
2. Whisk the eggs in a mixing bowl until light and fluffy, 1-2 minutes. Whisk in the sugar, a little at a time, then continue whisking until completey blended, about 1 minute more. Pour in the cream and vanilla and whisk to blend.
3. Pour the chocolate mixture into the cream mixture and blend. Cover and refrigerate until cold, about 1-3 hours.
4. Transfer the mixture to an ice cream maker and freeze according to manufacturer's directions.
5. Add the marshmallow fluff and mix gently until incorporated.
Crockpot Chicken Taco Soup
What do you like on your tacos? When I make them, it's imperative that I have lettuce, tomato, black olives, cheddar cheese, sour cream, and salsa. I totally get the stink eye when I forget the black olives, so I stock up when they're on sale.
With this in mind, I knew it was important to include black olives when I made this recipe from Running Mama Cooks. It wasn't until I opened the can that I realized they also had jalapenos in them. This is a concern when you have a son who "hates spicy food."
As I was browning the chicken, my husband, who is home sick today, remarked that it smelled awesome in there and wanted to know what was cookin. I told him, and he got very excited about it. I expressed my concern that it wouldn't be filling enough for dinner, and threw out adding rice to the dish. His suggestion was that we use pita bread rather than tortilla chips to dip and also fill our bellies a little more.
Ironically, my three year old didn't complain it was spicy, though the rest of us did. I added heavy cream to it for all of us, which was a great addition, but it was still way too spicy for us. I think it was the added jalapenos that did it. The base flavor was definitely tasty aside from the spice, so I'll be trying this one again and...um...omitting a little of the heat!
Crockpot Chicken Taco Soup
Slightly Adapted from Running Mama Cooks
4 servings
Ingredients:
1 lb boneless skinless chicken tenders, cut into chunks (I used chicken breast)
Olive oil cooking spray
1/2 large onion, chopped
1/2 yellow pepper, chopped (I used a red pepper)
1 tbs minced garlic (I used a heaping spoonful of chopped garlic)
14.5 oz can diced tomatoes
4 cups vegetable broth (I used two cans of chicken broth)
1 packet low sodium taco seasoning (I used 1/2c of this seasoning recipe)
4.5 oz green chili's, drained
1.5 cups frozen corn
2.25 oz sliced black olives with jalapenos
Directions:
Heat pan to medium heat, spray generously with cooking spray. Add chicken and brown on all sides. Add onion, pepper and garlic and cook for 5 more minutes.
Spray crockpot with cooking spray. Add chicken and vegetables. Add the rest of the ingredients and cook on low for 6-8 hours. Serve with tortilla chips, sour cream and/or a little bit of Mexican cheese on top.
Shepherd's Pie
Shepherd's Pie. One of many comforting winter dishes one can make when she has a case of the "I need some cozy." I've never made this before because my husband's dislike of beef keeps me away from a lot of traditional beef recipes. Since he wasn't going to be home for dinner the other night, I went ahead and put it on the menu. But I made it with ground turkey anyway.
This was delicious, and much easier than I thought shepherd's pie would be to make. I ran out of cheddar, so I substituted it with monterey jack. As usual, I couldn't be bothered to measure out tomato paste or use a partial can, so I just used a whole 8oz can of it, and I also used skim milk.
This was very yummy and very comforting. I enjoyed it, and will be having the leftovers soon. Hungry Baby ate and ate and ate it. Big Brother picked at it.
I thought ahead and made this in two pans. I put one directly in Pyrex and the other I put foil underneath it then froze the foil one. I then wrapped the foil around the food and put in a freezer zipper bag. Cook once, eat twice!
- 2 pounds baking potatoes (about 4), peeled and thinly sliced
- Coarse salt and ground pepper
- 1 tablespoon vegetable oil, such as safflower
- 6 medium carrots, halved lengthwise, quartered if large, and thinly sliced
- 6 celery stalks, thinly sliced
- 1 large onion, chopped
- 1/2 teaspoon dried thyme
- 1/4 cup all-purpose flour
- 1/4 cup tomato paste
- 2 pounds ground beef chuck
- 1 cup whole milk
- 1 1/2 cups shredded sharp white cheddar (6 ounces)
Directions
- Preheat oven to 450. Place potatoes in a large saucepan, and cover by 1 inch with salted water. Bring to a boil; reduce to a simmer. Cook until potatoes are easily pierced with the tip of a paring knife, 15 to 20 minutes.
- Meanwhile, heat oil in a 5-quart Dutch oven or heavy pot over medium-high. Add carrots, celery, onion, and thyme. Cook, stirring occasionally, until vegetables are tender, 8 to 10 minutes. Add flour and tomato paste; cook, stirring, 1 minute. Add beef; cook, stirring occasionally, until no longer pink, 6 to 8 minutes. Add 1 cup water; bring to a boil, and simmer 1 minute. Set beef filling aside.
- Drain potatoes; return to pan. Cook over medium, stirring, until liquid has evaporated and a thin film covers bottom of pan, about 1 minute. Remove pan from heat; add milk and 1 cup cheese. Mash until smooth; season cheddar-potato topping with salt and pepper.
- Pour beef filling into a 13-by-9-inch baking dish. Drop dollops of topping over filling; spread to edges with a spatula. Using a fork, make decorative peaks; sprinkle with remaining 1/2 cup cheese. Bake until topping is browned and filling is bubbling rapidly, about 20 minutes (if topping and filling were chilled, increase to 35 minutes). Let stand 5 minutes before serving.
From Everyday Food, October 2008
Read more at Marthastewart.com: Cheddar-Topped Shepherd's Pie - Martha Stewart Recipes
Mom's Goulash/Lighthouse Lasagna
With a name like Lighthouse Lasagna, I feel the need to pay homage to my favorite lighthouse, the one I could see from my childhood bedroom, the one I miss living near very much... Barnegat Light.
I first learned of this recipe from my friend Lauren, but I made it more like Annie did by using penne pasta instead of egg noodles. I also discovered no sour cream in the fridge (which is very rare), so subbed yogurt. I used low fat plain yogurt, and it seems to have worked well.
You know how, when you get a baked pasta from your local pizza parlor, the cheese filling tastes unlike the cheese filling of any other baked pasta dish you've ever had? This tasted like that. The whole dish reminded me of a baked ziti from random NJ pizza parlor.
It makes a LOT, so I froze about half of it after baking. We'll see how it reheats after freezing.
This was yummy. Hungry Baby devoured his. Mr. "I just want dessert" ate a whole bowl, but I had to feed it to him. I went back for seconds.
Here's the recipe; I sure hope I attribute it correctly!
Photo credit: Manny Pabla
(http://farm2.static.flickr.com/1203/1110599148_6d0aedd5eb.jpg)
Photo credit: Chris LoBue
clbphoto.com
I first learned of this recipe from my friend Lauren, but I made it more like Annie did by using penne pasta instead of egg noodles. I also discovered no sour cream in the fridge (which is very rare), so subbed yogurt. I used low fat plain yogurt, and it seems to have worked well.
You know how, when you get a baked pasta from your local pizza parlor, the cheese filling tastes unlike the cheese filling of any other baked pasta dish you've ever had? This tasted like that. The whole dish reminded me of a baked ziti from random NJ pizza parlor.
It makes a LOT, so I froze about half of it after baking. We'll see how it reheats after freezing.
This was yummy. Hungry Baby devoured his. Mr. "I just want dessert" ate a whole bowl, but I had to feed it to him. I went back for seconds.
Here's the recipe; I sure hope I attribute it correctly!
Ingredients:
1 lb. ground sirloin (or ground turkey)
1 (6 oz.) can tomato paste
1 (15 oz.) can tomato sauce (I used 2- 8oz cans)
1 tsp. sugar
½ tsp. dried basil
½ tsp. dried oregano
Kosher salt
1/3 cup water
1 lb. tube pasta, such as penne
1 cup low fat yogurt
4 oz. cream cheese, softened
1 large egg
4 oz. mozzarella cheese, shredded
Directions:
Preheat the oven to 375˚ F. Lightly grease a 9 x 13″ baking dish.
Brown the meat in a large skillet over medium heat, crumbling it up as it cooks. Drain off the excess fat, if necessary. When the meat is no longer pink, stir in the tomato paste, tomato sauce, sugar, basil, oregano, and salt to taste. Stir in the water. Reduce the heat and simmer, covered, 15-20 minutes.
Meanwhile, bring a large pot of water to boil. Cook the pasta just until al dente. Drain well and set aside.
In a small bowl, combine the sour cream, cream cheese, and egg. Mix well to blend. Stir in the green onions.
To assemble, spread a very thin layer of the sauce mixture over the bottom of the baking dish. Top with half of the pasta. Spread half of the sour cream mixture over the pasta, then top with half of the remaining sauce. Repeat layers with the remaining pasta, sour cream mixture and sauce. Sprinkle shredded mozzarella evenly over the top.
Bake for 30 minutes, or until the cheese is browned and bubbling. Let stand at least 5 minutes before serving.
Tuesday, February 1, 2011
Knife Skills
My knife skills are terrible. Really terrible. I took a seminar at Williams Sonoma, but being free, it was more a "knife sales pitch." Ugh.
Anyway, this video by the always awesome Alton Brown is really helpful to anyone whose knife skills are also terrible!
Subscribe to:
Posts (Atom)