Pages

Thursday, September 30, 2010

Creamy Corn and Spinach Enchiladas

Photobucket

I found this in Make it Fast, Cook it Slow, and The Crockpot Lady happens to have all her recipes also posted on her blog!

This took several nights to make, since I kept forgetting to make it!!  But I finally got around to it last night.  We both agreed that it smelled delicious, but looked disgusting.  BAJ thought it was good enough to eat tonight, but that he didn't want it again, while I thought it was awesome, and went back for seconds.

--1 can (14.5 oz) creamed corn
--1 cup shredded already-cooked meat  I used chicken, following this recipe
--1 cup baby spinach leaves
--1/4 cup finely chopped fresh cilantro leaves  I used jarred
--2 T chopped sliced jalapenos
--1 1/2 cups shredded cheese (I used a packaged Mexican blend)  I used a blend of Colby Jack and cheddar

--1 can (28 oz) green enchilada sauce  I used a small can; I think it was 14.5oz
--2/3 cup sour cream
--corn tortillas
--more shredded cheese

The Directions.

I used a 6qt Smart-Pot for this. You can easily use a 4qt, but instead of making each enchilada separately, you can just stack the ingredients in a casserole.

In a large mixing bowl, combine the shredded meat, creamed corn, cilantro, spinach leaves, jalapenos, and shredded cheese. Mix. You may need to use your hands to get the spinach leaves really wilty and coated with the creamed corn.

This is your enchilada filling.

Put a corn tortilla out on the counter, and plop a spoon full of filling in the center. Roll into an enchilada shape and put it seam-side down in your crockpot. Repeat until you run out of filling. I used 10 corn tortillas before I ran out. I stacked them to fit.

Either wash your mixing bowl, or get out another. Combine the green sauce with the 2/3 cup of sour cream. This is optional, I guess, but it tastes really good.

Pour the sauce on top of your enchiladas. Add a few handfuls of shredded cheese for good measure.

Cover and cook on high for 2-4 hours, or on low for 5-7.
I cooked ours on low for 8 hours and it was too long. Everything got really mushy.

Let stand for 20 minutes with the lid off before cutting into.

Stuffed Zucchini Boats

This week, my produce co-op gave us an enormous zucchini.
Photobucket

With no idea what to do with it, I took the recipe they provided, which also used up a lot of the other ingredients in the box.  Mind you, my husband doesn't like zucchini AT ALL, so I made it for lunch one day for Little Man and me.

Photobucket

It sounds like it would be good, but I couldn't muster more than a few bites.


Ingredients:
1 very large zucchini or yellow squash, washed and cut in half lengthwise
1-2 hot peppers, washed, seeded, and chopped (opt)
2c bread crumbs
1-2 tomatoes, chopped
3-4 cloves garlic, pressed
1lb ground turkey or mased tofu, (opt)
1-2 onions, chopped
1 bunch Swiss chard, washed, boiled for 2 minutes, drained and chopped
cheese or soy cheese

Saute onions in a large skillet with garlic and chopped hot peppers.  Add ground turkey or tofu and cook till browned.  Ad Swiss chard greens and mix well.  Season with salt and pepper.   Remove from heat and add bread crumbs and chopped tomatoes.  Scoop seeds out of zucchini halves.  Stuff zucchinis wtih veggie mixture; top with cheese and place on an oiled baking sheet, covered with foil.  Bake in a 425 degree oven for about 1/2 an hour, or until squash is tender.  Uncover in last 5 minutes of cooking so cheese can brown.  Serve with tomato ketchup or tomato sauce.

Raspberry Cheesecake Brownies

Photobucket

When this popped up in my google reader, I knew I had to make it... stat.  The time came last night, when there was some time for Little Man and I to get er done.  These came from Cooking for Seven, and they were outstanding!  I love chocolate and raspberries, and my husband loves cheesecake.  Seemed like a perfect fit!

They involved a lot of steps, and made a lot of mess, but were so worth it.  Yummy!!

Raspberry Cheesecake Brownies
Ingredients:
  • 1 cup flour, sifted
  • 2 cups sugar, divided
  • 7 oz butter, cut into pieces
  • 7 oz dark chocolate, chopped  I used a mix of milk chocolate and semisweet chocolate chips
  • 5 oz raspberries, fresh or frozen
  • 14 oz cream cheese, room temperature  I used Neufchatel
  • 1 tsp vanilla extract
  • 5 eggs, room temperature

Directions:
For the brownie batter:
1) Preheat oven to 350° F. Butter a 8″x 12″ baking tray (I used a 13″x9″ glass baking dish). Line with baking paper.
2) Beat the softened butter with 1 cup of sugar until slightly fluffy. Add 3 eggs, one at a time, beating well after each addition.
3) Melt the chocolate in a double boiler or in a bowl set over a pan of simmering water. Let cool slightly. Stir into the butter and sugar mixture. Add the sieved flour and carefully fold it in.
For the cheesecake batter:
4) Put the cream cheese in the bowl of your stand mixer. Add the 2 remaining eggs, 1 cup of sugar, and 1 tsp vanilla extract. Beat until it’s a smooth, creamy mixture.
Putting it all together:
5) Spread 2/3 of the chocolate mix on the bottom of your baking tray. Pour the cream cheese on top and spread it out evenly. Now drop little pieces of chocolate mix on top of the cream cheese. Lightly work it in with a fork—like you’re marbling a cake. Push the raspberries into the cream cheese.
6) Bake at 350°F (175C) for 40 to 45 minutes or until the cake feels set when gently touched in the center. Let the brownies cool off completely, preferably overnight, before cutting them in squares.


Tuesday, September 28, 2010

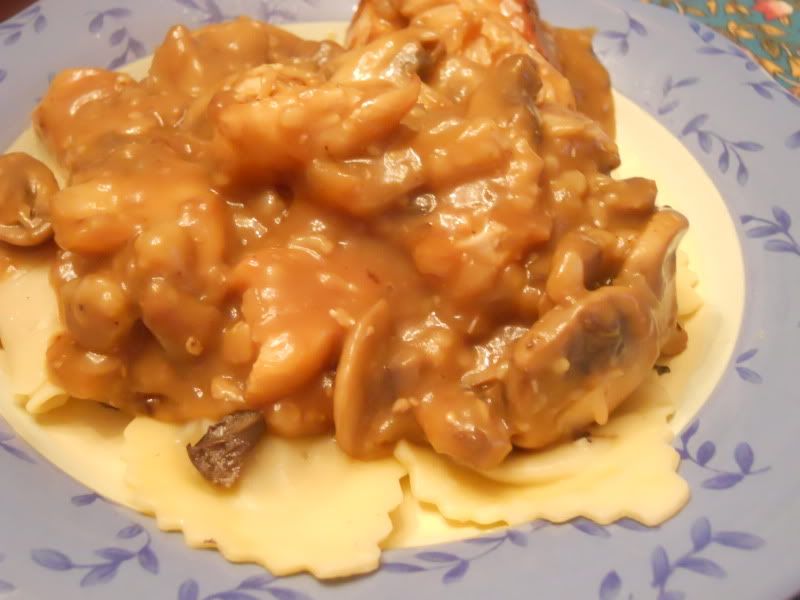
Mushroom Ravioli with Marsala Sauce and Chicken

Photobucket

I made this once before with great results, but it wasn't nearly enough for the three of us.  With a package being very expensive, I had a hard time convincing myself to buy two (and spend $10 on a "home cooked" meal.)  This time around, I added some pan fried chicken to the sauce to give us some protein and a little more food.

The breast I had was ENORMOUS, and I realized too late that it would be a good idea to add it, so it wasn't cooked very well (overcooked in this case), but it was a nice addition to this meal.

The idea for the ravioli with marsala comes from Lauren, who took the recipe for the sauce from food network.  Original links are in my original post!

Ingredients
  • 3 tablespoons olive oil
  • 1/4 cup onion, diced
  • 1 tablespoon garlic, chopped
  • 1/2 pound mushrooms, sliced
  • 3 tablespoons flour
  • 1/2 cup Marsala wine
  • 1 1/2 cups beef stock
  • Salt and pepper, to taste
Add olive oil to heavy hot saucepan. Add onions, garlic, mushrooms, saute until mushrooms are tender. Add flour and cook about 1 minute then deglaze pan with Marsala wine. Add beef stock and cook until thick and flavors are blended.

Tuesday, September 21, 2010

No Bake Stuffed Peppers

Photobucket

I really need to put my meal plan on here, because the sheet of paper I do it on has gotten lost two weeks in a row. I know Stuffed Peppers was on there, and had the ingredients ready, so to the internet! I found this in my Reader, and it's from Sing for Your Supper.

This was pretty easy to put together, and though we couldn't get Little Man to eat much, we both enjoyed it a lot. This will definitely be making it into our rotation; it's like the perfect meal--veggie, lean protein, and some whole grains!

2 medium bell peppers (any color)
1 teaspoon sugar
1/2 teaspoon basil
1-15 ounce can tomato sauce
1 pound lean ground beef I used ground turkey
1 small onion, chopped
2 cups rice, cooked
1/2 cup grated cheddar cheese
Cut peppers in half lengthwise. Bring a large pot of salted water to a boil, drop the peppers in and boil for 5-6 minutes. In a small bowl, mix tomato sauce, basil and sugar and set aside. Brown meat and onion in a large skillet; drain. Stir in 1/2 the tomato sauce, 1/2 cup of the rice and the salt I just guessed--maybe a teaspoon or two. Cover and simmer for 5 minutes; stir in cheese. Spoon meat mixture into peppers and place into skillet. Pour remaining tomato sauce around peppers; cover and simmer. Top with additional cheese, if desired. Serve on top of remaining rice.

Monday, September 20, 2010

Pumpkin Spice Latte

Although it is still technically summer, Starbucks has brought back its Pumpkin Spice Latte. It's so full of sugary tastiness, it's one of the only ways I can tolerate Starbucks coffee. Checking out Make it Fast, Cook it Slow from the library couldn't have come at a better time; a SAHM with no income has a hard enough time not spending wads of cash and this will make it easier for me to avoid the Starbucks/coffee shop in the mall.

Stephanie posted the recipe on her blog here. I didn't take a picture, which is probably for the best because mine didn't look nearly as pretty as hers does.

--2 cups milk (I used skim)
--2 T canned pumpkin
--2 T white sugar
--2 T vanilla (not a typo. it asks for tablespoons)
--1/2 tsp pumpkin pie spice
OR: 1/4 tsp cinnamon, 1/8 tsp cloves, 1/8 tsp nutmeg, and a teeny tiny pinch of ground ginger
--1/2 cup brewed espresso or 3/4 cup strong brewed coffee

--garnish with whipped cream (optional)

The Directions.

This will make enough for 2 people to have a big mug with a bit leftover. If you are having friends over, adjust the recipe accordingly. I used a 4-quart crockpot, but as small as a 1.5 quart will work with these amounts.

Add the coffee/espresso and milk to the crockpot. Whisk in the pumpkin, spices, sugar, and vanilla.

Cover and cook on high for 2 hours if everything is cold. Whisk again.

Ladle into mugs, and garnish with whipped cream and additional cinnamon.

Friday, September 17, 2010

Mexican Rice

Photobucket

I had never before made Mexican Rice, so had no idea how very easy it is to make. It's really easy to make, and this version tasted so much like the kind of rice you find at your favorite chain Mexican food restaurant that it's amazing.

Ingredients

  • 3 tablespoons vegetable oil
  • 1 cup uncooked long-grain rice
  • 1 teaspoon garlic salt
  • 1/2 teaspoon ground cumin
  • 1/4 cup chopped onion
  • 1/2 cup tomato sauce
  • 2 cups chicken broth

Directions

  1. Heat oil in a large saucepan over medium heat and add rice. Cook, stirring constantly, until puffed and golden. While rice is cooking, sprinkle with salt and cumin.
  2. Stir in onions and cook until tender. Stir in tomato sauce and chicken broth; bring to a boil. Reduce heat to low, cover and simmer for 20 to 25 minutes. Fluff with a fork.

Chicken Chile Verde

Photobucket

I got some tomatillos from our co-op, and was looking for a way to use them up. I knew I could have used them in a salsa, but didn't want to have to figure out a place to store them. So, I turned to google reader and this turned up. It was perfect; I had everything on hand, including a bunch of cilantro that also came from the co-op.

It calls for 5-6 small breasts, but our breasts were really large and used three. It probably wasn't enough for the amount of sauce it made. There was a TON of sauce, but I went ahead and saved it so I can just brown up some chicken and simmer it together.

Little Man ate a few pieces, but then decided he didn't like the chicken. M and I really liked it and will be adding it to the rotation (depending on if we can get tomatillos again... never having sought them out before, I don't know what their season is or how difficult they are to find).

I made a few changes, based on what I had: I used minced garlic and presliced jalapenos and just guesstimated on the right amounts. I served with Mexican Rice and a salad. Yummy meal!!

Chicken Chile Verde
  • 5 cloves garlic, peeled
  • 2 jalapenos, stem removed (and seeded if necessary to reduce the heat)
  • 10 tomatillos, husks removed and rinsed
  • 1/2 of a large white onion, quartered
  • 1/3 cup fresh cilantro, rinsed
  • 4 tablespoons vegetable oil
  • 5-6 small boneless, skinless chicken breast, cut into 1" cubes
  1. Place garlic, jalapenos, tomatillos, and onion in a large stock pot with just enough water to cover. Bring to a boil (see step 3) over medium heat, and cook, uncovered, for about 25 minutes.
  2. Add contents of the pot to a blender along with 1/2 cup water and cilantro. Puree until smooth, being careful to allow steam to escape while blending or you will end up with a newly decorated kitchen in a wonderful shade of green!
  3. When tomatillo mixture reaches a boil, heat oil in a large skillet over medium heat. Brown chicken until no longer pink, then drain skillet. Add pureed tomatillo mixture to skillet, then add salt, to taste. With the lid cracked, simmer over medium low heat for 30 minutes. Serve with mexican rice and tortillas, garnished with lime for juicing.

Pulled Pork

This popped up in my Google Reader, and I saw pork shoulder on sale, so thought it would be a great thing to make. It comes from Mel's Kitchen Cafe.

My plan was to make it for us, but I ended up not making it so I instead took it to my parents' house for dinner with them.

We all really liked it, though we had a hard time getting Little Man to eat his. He loved the bread, though!

It was super duper easy, probably even easier than the previous pulled pork recipe I made. And it's made in the crock pot, so I just dumped everything in and let it cook away.


BBQ Pulled Pork Sandwiches
Printable Version with Picture
Printable Version

3 to 4 pounds boneless pork shoulder (I’ve also used boneless pork loin – not tenderloin – but pork loin with good results)
1/4 teaspoon fresh ground pepper
1/4 teaspoon salt
2 cups water
1 tablespoon hickory flavored liquid smoke
2 cups barbecue sauce

Rinse the pork shoulder and pat dry. Rub salt and pepper over the pork and place in a slow cooker. Add water and liquid smoke. Cook on low setting for 8 to 10 hours, until the pork is very tender.

Remove the pork from the slow cooker and discard the remaining liquid. Shred the pork using a couple of forks. Place the meat back in the slow cooker along with the barbecue sauce and continue to cook for another 20-30 minutes until the pork is hot again. Serve on buns with extra barbecue sauce.

Thursday, September 2, 2010

Chicken Ranch Pizza

Photobucket
I'm really happy with the version of pizza dough I make. But, we're starting to get bored with the traditional pizza and toppings. This summer, I've made pizza on the grill, BBQ chicken pizza, and now chicken ranch pizza. It's yet another recipe I've taken from the wonderful Annie's Eats. To be honest, I didn't quite make this. I did make the dough, but had to feed the babe, so M took over the preparation duties.

This came out quite tasty! Little Man (Formerly known as The Boy) wasn't a big fan, and barely touched his, but we liked it a lot! I think he rolled the crust a little bit too thin, perhaps because I only gave him half the dough to work with... I like my dough with a little doughiness to it, rather than cracker like.

So, yet another win for Annie's Eats!!

Chicken Ranch Pizza
Printer-Friendly Version

Ingredients:
½ batch of perfect pizza crust¼ cup Ranch dressing
¾ cup shredded mozzarella cheese
½-1 grilled chicken breast, chopped into bite-sized pieces
1 tomato, seeded and diced
2-3 green onions, chopped
¾ cup shredded cheddar cheese
Directions:
Preheat the oven and a pizza stone to 500° F. Allow the stone to heat for at least 30 minutes. In the mean time, cut a round of parchment paper the size of your pizza stone. (Alternatively, use a pizza peel.) Sprinkle lightly with cornmeal or semolina flour. Gently roll out the pizza dough into a large circle, leaving a thicker ring around the edge for the crust. Spread the Ranch dressing in a thin layer evenly over the unbaked crust. Sprinkle with shredded mozzarella. Top with grilled chicken, tomato and green onions. Sprinkle with shredded cheddar. Once assembled, carefully transfer the parchment round and pizza to the preheated baking stone and return to the oven. Bake for 10-12 minutes, or until the cheese is melted and browned. Slice, serve, and enjoy!

Panzanella

Photobucket

I added this to the meal plan, only to realize we weren't going to be around for one of the days I planned for. When I had M decide which meal to delete, he wanted to get rid of Panzanella. I figured it would be a great lunch, so got the ingredients anyway.

I'm so glad I did, because last night had us running around late for dinner, AGAIN, and to make the planned meal would have had us eating after 7. This, instead takes about 10 minutes to put together, after all your chopping time.

It was very tasty, though I am glad I added some shredded mozzarella for some protein... in the future, I would use cubed mozzarella instead. Unfortunately, it wasn't super filling, and so I ate about half the bowl! I didn't have any Champagne vinegar, so instead used white wine vinegar with great results. I do wish I had made more of the vinaigrette, because it was a little bit too dry with what I ended up making. I also might add in some kalamata olives next time for some nice salty flavor.

Overall, a very tasty dish with lots of end of summer veggies that is super fast to make!

Ingredients

  • 3 tablespoons good olive oil
  • 1 small French bread or boule, cut into 1-inch cubes (6 cups)
  • 1 teaspoon kosher salt
  • 2 large, ripe tomatoes, cut into 1-inch cubes
  • 1 hothouse cucumber, unpeeled, seeded, and sliced 1/2-inch thick
  • 1 red bell pepper, seeded and cut into 1-inch cubes
  • 1 yellow bell pepper, seeded and cut into 1-inch cubes
  • 1/2 red onion, cut in 1/2 and thinly sliced
  • 20 large basil leaves, coarsely chopped
  • 3 tablespoons capers, drained

For the vinaigrette:

  • 1 teaspoon finely minced garlic
  • 1/2 teaspoon Dijon mustard
  • 3 tablespoons Champagne vinegar
  • 1/2 cup good olive oil
  • 1/2 teaspoon kosher salt
  • 1/4 teaspoon freshly ground black pepper

Directions

Heat the oil in a large saute pan. Add the bread and salt; cook over low to medium heat, tossing frequently, for 10 minutes, or until nicely browned. Add more oil as needed.

For the vinaigrette, whisk all the ingredients together.

In a large bowl, mix the tomatoes, cucumber, red pepper, yellow pepper, red onion, basil, and capers. Add the bread cubes and toss with the vinaigrette. Season liberally with salt and pepper. Serve, or allow the salad to sit for about half an hour for the flavors to blend.