Pages

Friday, September 28, 2012

Nectresse Review

This is a Sponsored post written by me on behalf of NECTRESSE™Sweetener for SocialSpark. All opinions are 100% mine.

I do not like artificial sweetener; I worry about the potential risks of the chemicals in the product and I HATE the taste.  Of course, I know there are risks associated with regular sugar too.  So I was both interested and skeptical when NECTRESSE™Sweetener arrived on my doorstep.


First, I tried the product in my tea.  I wasn't a huge fan, but must make a note that I usually drink tea without any sweetener at all.  I then tried it in coffee and while it wasn't bad, it would take me some getting used to.  I then had a friend over and offered it when she asked for a cup of tea; she is an artificial sweetener user and said she really enjoyed it.


Nectresse is an interesting blend of no calorie sweetener and all natural (read:  no artificial junk); it's made from "monk fruit," and seems to be 150x sweeter than sugar; this is the only 100% natural sweetener made from fruit in my grocery store.


also made a video about the product; you should check it out!


You can get a FREE sample of NECTRESSE™Sweetener by visiting the Nectresse sample site.  Also take a look at the Nectresse Facebook page.


Visit Sponsor's Site

Wednesday, September 26, 2012

Nectresse Review

I do not like artificial sweeteners; I worry about the potential risks of the chemicals in the product and I HATE the taste.  Of course, I know there are risks associated with regular sugar too.  So I was both interested and skeptical when Nectresse arrived on my doorstep.

First, I tried the product in my tea.  I wasn't a huge fan, but must make a note that I usually drink tea without any sweetener at all.  I then tried it in coffee and while it wasn't bad, it would take me some getting used to.  I then had a friend over and offered it when she asked for a cup of tea; she is an artificial sweetener user and said she really enjoyed it.

Nectresse is an interesting blend of no calorie sweetener and all natural (read:  no artificial junk); it's made from "monk fruit," and seems to be 150x sweeter than sugar; this is the only 100% natural sweetener made from fruit in my grocery store.

Lisa Ling also made a video about the product; you should check it out!


You can get a free sample by visiting the Nectresse sample site.  Also take a look at the Nectresse Facebook page.

Sunday, September 23, 2012

Meal Plan Monday!

A short week this week means easier breakfasts and lunches for an extra day; YAY!  This was LAST WEEK'S meal plan; I don't know why it didn't post.

Monday:
Dinner--Tempeh Tacos

Tuesday:
Breakfast--Overnight Oatmeal.  Really enjoyed the mango-almond combo last week.
Lunch:  Mac and Cheese.  I used the ATK skillet mac and cheese.
Dinner:  Stuffed Peppers (dangerous because I haven't found a recipe I plan to use)

Wednesday:
Breakfast--Egg Muffin
Lunch--Mini Burritos
Dinner--Meatballs

Thursday:
Breakfast--Waffles
Lunch--Meatballs
Dinner--Rotini with Summer Vegetables (America's Test Kitchen Best 30 Minute Meals)

Friday--MY BIRTHDAY!!!!
Breakfast--Hard boiled eggs and fruit
Lunch--Tomato Soup with Cheese and croutons
Dinner--Pineapple Glazed Chicken

Saturday:
Out with Mom and Dad

Sunday:
Pasta Norma

Monday, September 10, 2012

Meatless Monday--Cheese Tortellini Salad

My sons have not been eating dinner so much lately.  They wake up starving and their dad and I are frustrated.  So when I searched the trusty Google Reader for meatless meals, this recipe from Ezra Poundcake made the cut.  I knew that even if the boys didn't eat the salad itself, there was no doubt they'd eat the tortellini and the gorgeous cherry tomatoes from the CSA.

And that's exactly what happened.

This salad was tasty and surprisingly filling.  I wish I'd nixed the Parmesan and instead added chunks of mozzarella cheese.


Cheese Tortellini Salad Source Cooking Light Mix & Match Low-Calorie Cookbook via Ezra Poundcake
    1 (9-ounce) package fresh cheese tortellini
    2 cups halved cherry tomatoes
    2 cups fresh spinach leaves, coarsely chopped
    1/2 cup chopped pepperoncini peppers
    6 tablespoons (1.5 ounces) shredded fresh Parmesan cheese
    1/4 cup capers
    1/4 cup chopped fresh basil
    1 (16-ounce) can navy or Great Northern beans
    2 tablespoons fresh lemon juice
    1 1/2 tablespoons extra-virgin olive oil

    Cook the pasta according to package directions, omitting the fat.
    Meanwhile, combine the tomatoes, spinach, peppers, cheese, capers, basil, and beans in a large bowl.
    Drain pasta; rinse with cold water.
    Add pasta, lemon juice, and oil to the tomato mixture. Toss gently. Serve immediately.

Meal plan Monday!

Here we go, Week 2!

Monday:
B--Waffles and yogurt
L--PB&J, melon, veggie (TBD)
D-Eggplant Parm with Garlic Bread

Tuesday:
B--Mango Almond Refrigerator Oatmeal
L--Chili with Tortilla chips and fruit
D--Slow Cooker Greek Chicken

Wednesday:
B--Muffin (store bought?)
L--Egg Salad
D--Chicken Nuggets

Thursday:
B--Egg muffins
L--Leftover chicken nuggets with melon
D--Roasted Tomatoes with Burrata and Pesto

Friday:
B-- Banana Roll Ups
L--Mango and Black Bean Salad
D--Divine Chicken

Saturday and Sunday are currently up-in-the air!


Saturday, September 8, 2012

Recipe Swap: Buckeye Brownies


When it comes to brownies, I love the corner.  Yeah, the middle pieces are softer, but I like the crisp edges that comes with the corner pieces.

For this week's recipe swap theme of desserts, I was given Buckeye Brownies from Kickin it in the Kitch.

When I made the batter, I was VERY concerned; it was way thicker than brownie batters to which I am accustomed and I thought I must have missed an egg or something.  In reality, they were perfect!  Thick and rich and decadent, and I loved the soft layer made of condensed milk and peanut butter.  These were a big hit with me and my boys, and they'll be going in lunchboxes this week.

I considered doubling the recipe and making it in two pans so as to not have leftover condensed milk, which I might do next time, but this time I made the recipe as written and saved the milk in a jar in the fridge.


Thank you to Sarah for hosting another great swap and Stef for sharing a great recipe.  Apologies to both of you for the lateness of my post!

What about you; which part of the brownie pan is your favorite?


Buckeye Brownies
Source: Adapted from Cookies and Cups via Kickin it in the Kitch

Ingredients:
For the brownie portion (original recipe here)
1/2 cup (1 stick) unsalted butter

1 1/8 cups sugar
2 large eggs
1 1/8 cups Dutch-process cocoa (regular cocoa is fine too)
1/2 teaspoon salt
1/2 teaspoon baking powder
1/2 tablespoon vanilla extract
3/4 cup All-Purpose Flour
1/2 cup coarsely chopped peanuts


1/2 can sweetened condensed milk
1/4 cup peanut butter

Directions:

1. 
Preheat the oven to 350°F. Lightly grease an 8x8 baking pan.


2. In a microwave-safe bowl, melt the butter, then add the sugar and stir to combine.

3. Crack 2 eggs into a large bowl, then beat them with the cocoa, salt, baking powder, and vanilla until smooth. Add the hot butter/sugar mixture, stirring until smooth.

4. Add the flour and stir until smooth. Mix in the chopped peanuts.

5. Pour half of the brownie mixture into the pan.

6. Whisk together the sweetened condensed milk and peanut butter. Spread over the brownie mixture in the pan.

7. Drop the remaining brownie mixture over the top of the peanut butter mixture and press down gently.

8. Bake for 30-35 minutes.


Monday, September 3, 2012

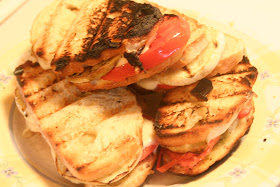
Eggplant Panini with Pesto

I hope you're having a great Labor Day!

For a long time, I was hesitant to make panini sandwiches; with no panini press and no grill pan, I had no idea how I was going to make them.  I then read a book that explained a way to make them without a press.  Then, I made the sandwich on the stove and literally piled pans on top of it, flipped, and piled again.

It's so much easier since I was given cast iron pans.


 In other news, we had this gorgeous WHITE eggplant from the CSA.  I had no idea what to expect, but it tasted pretty much exactly like your standard purple eggplant.


I made these paninis complete on the grill.  The bread obviously got a little...cajun...  but even with the blackened parts, this was a delicious sandwich!  So easy, so fresh, so tasty, and so healthful!

Eggplant Panini with Pesto  Slightly adapted from Skinnytaste
    1 large eggplant, about 12-14 oz, sliced into 1/4" pieces
    kosher salt to taste
    olive oil
    12 oz french bread (or baguette), cut into 4 pieces
    4 slices part skim mozzarella cheese
    2 tbsp pesto
    8 thin sliced tomato


1.  Preheat your grill to medium.  You can salt the eggplant, if you'd like, but I read in Everyday with Rachael Ray that modern eggplants have been bred to have the bitter out.  Do what'cha like.
2.  Brush olive oil on each side of sliced eggplant then season with salt and pepper.  Grill on hot grill until soft, about 3-4 minutes a side.  Put aside.
3.   Build your sandwich:  spread pesto over one slice of bread, grilled eggplant, slice of mozzarella, a slice of tomato, and a second piece of bread.  Spray or brush with oil, place on hot grill, and smoosh the sandwich with a heavy pan.  After a minute or two, remove pan, flip sandwich, and repeat on the other side.
4.  Slice in half (on the diagonal!) and enjoy!!

Saturday, September 1, 2012

Mexican Pizza

When I told my husband we were having pizza for dinner, he told me to make sure I got spaghetti sauce and mozzarella when I went to the store.  Funny enough, I didn't need either for this version of pizza (well, I needed mozzarella, but I had a package in the fridge).

This was so incredibly tasty, and was a great end to a week chock full of delicious homemade meals.  My pizza turned out really ugly because, for some reason, we tend to have problems getting our pizza from the pizza peel to the pizza stone.  It didn't at all take away from the yum that was this pizza.

Make this for your next pizza night.  Dooooo it!!

Mexican Pizza Source:  Stephanie Cooks
Ingredients:
1 batch pizza dough
1 tsp. olive oil
1 bell pepper, sliced thin
1 clove garlic, pressed or minced
3 ounces chicken
1/2 tsp. taco seasoning
1 cup salsa
1/3 cup shredded cheddar cheese
1/3 cup shredded mozzarella cheese

Directions:
1- Preheat the oven to as hot as it will go with your pizza stone in the oven.
2- Prepare your dough, rolling it out on a surface coated in corn meal or parchment paper.
3- Heat the oil over medium heat in a skillet.  Add garlic and peppers, cooking until soft.
4- Rub the chicken breast with taco seasoning; dice the chicken. Add to the skillet, cooking until cooked through.
5-Add the salsa to the skillet, stirring well. Stir over medium heat for a couple minutes to warm through.
6- Top the pizza with the salsa mixture. Top with both cheesees. Bake 7-10 minutes on the pizza stone or until cheese is melted.
7- Serve hot.